My son, Chris, is 10 years old. Some of the things that come out of his mouth amaze me! I've decided I'd better keep track of some of the better ones so I can perhaps use them later (like when he's an adult). So, here's today's Chris-ism:
Me: Son, Mel's coming to pick us up to go shopping. You'd better change your shorts.
Chris: Why?
Me: Those are too tight.
Chris: No they're not. What makes them too tight?
Me: They're hugging your butt.
Chris: Mom, my butt deserves to be hugged!
**********************
He got to wear the shorts! I was lauging my ass off too hard to argue with that one!
Monday, July 05, 2010


Tuesday, June 22, 2010
Quick Tomato Salisbury Steak

Tomato Salisbury Steak
Beef mixture:
2 lbs. ground beef
1 egg
1/2 c bread crumbs
1/4 cup milk
1/2 - 2.8 oz can French's French Fried Onions, crushed
salt, pepper, garlic powder
Gravy:
1/2 green bell pepper, diced
5-6 button mushrooms, sliced
1 can tomato soup
1/2 soup can water
Form beef mixture into patties and brown on both sides, not cooking all the way through. Remove beef from pan. Saute bell pepper and mushrooms in a few tablespoons water to deglaze pan. When bell pepper starts to get soft, add tomato soup and water to pan, return beef patties to pan and turn to coat with gravy. Spoon gravy over top of patties. Cover and simmer on medium low for 20 minutes. Tilt lid to let steam escape if gravy gets too watery. Enjoy over mashed potatoes or hot rice.
Friday, June 04, 2010
Tea Bag Folding
 Pat and I were practicing our tea bag folding yesterday and we made these "flowers". We started with 3" squares and followed the instructions we found on http://www.paperprintables.com/. Three inch squares, when folded, create a flower that is about 4" across. Kinda big for a card but too pretty to waste, so here it is on the front of your basic A2 sized card. We figured that 1 1/2" squares resulted in a flower that was good for treat bags and 2" squares created a flower suitable for a card. You can get several of these flowers from a 12" x 12" piece of paper, but this is also a great project for scraps. Watch out! It's addicting! Of course, YouTube is a fabulous place to start and this link takes you to a video by RubberStampRosie that is wonderful! Who would have ever thought to use the inside of security envelopes for this project. Great recycling project as well.
Wednesday, May 26, 2010
Hershey's Nugget Box & Dove Chocolates Box
 I want to thank Beth Warner for her great instructions for making little boxes that can hold 3 Hershey's Nuggets. I've been seeing them on people's blogs but found her instructions yesterday and just had to try it myself. They are super cute! My only issue is the use of the dreaded 16th inches! Argh! I just bought the Martha Stewart scoring board last week and have been trying to scale up/down patterns because there are no 16th inch increments on that or my Fiskar's paper trimmer. Beth was so kind to post her instructions and I tweaked them to suit my "16th-inch-a-phobia" and here are my measurements on the score board.
Box: 6" x 4 1/2"
With the 6" side against the top of the board, score @ 3/4", 1 1/2", 4 1/2", & 5 1/4"
With the 4 1/2" side against the top of the board, score @ 3/4", 1 1/2", 3", & 3 3/4"
Top: 5 1/2" x 3"
With the 5 1/2" side against the top of the board, score @ 3/4", 2 3/8", 3 1/8", & 4 3/4"
I then followed Beth's instructions for assembly and it turned out great! Then I got to thinking, what other candy can I put in the box? I had some little Dove chocolates but they were too big soooooooooo...
Sized to fit 3 Dove chocolates:
Box: 5 1/2" x 3 1/2"
With the 5 1/2" side against top of the board, score @ 1/2", 1", 4 1/2", & 5"
With the 3 1/2" side against top of the board, score @ 1/2", 1", 2 1/2", & 3"
Top: 4 1/2" x 3 1/2"
With the 4 1/2" side against the top of the board, score @ 1/2", 2", 2 1/2", & 4"

Follow the assembly instructions for the Hershey's Nugget Box.
Treat bag template

So much to write about today but I don't know if I can get it all in.
Pat and I have been looking at all sorts of treat bag patterns & templates pretty much since we got our Cricuts. We've tried making a few and I have been pretty pleased with what we've done so far but I keep seeing more that I'd like to try. Pat's limited to the size of the bags she can cut with her Cricut as she has the Create so this one will be right up her alley...no Cricut needed! After seeing some projects online, I tried making my own template but I haven't yet tried to draw it out in Word so you'll just have to look at the pictures I took. I think you'll get the idea and the score lines are written on the template. I specifically wanted to be able to use my Martha Stewart Scoring Board. The treat bag is made using an 8 1/2" x 11" paper or cardstock. I like the look of the rounded edge on my topper flap but it would look great if you use a border punch.

The finished bag measures 4 1/2" H x 3" W.

Friday, May 21, 2010
A couple of treat holders
One of my favorite sources of inspiration is Dawn Griffith of Dawn's Stamping Thoughts on YouTube. As I am meeting a couple of friends for lunch today, I wanted to bring them some goodies. I came across this video and thought these would be perfect to make. I, however, don't have the Movers & Shapers die that she used so I had to cut my scalloped oval on my Cricut using the "09 Kutups" font and my SCAL. Otherwise, I used her instructions and simply embellished the front with a strip of paper and a small flower made using the EK Success punch Pat gave me. Thanks, Pat! I still have to add the clear bag full of candy to the treat bag to complete it but I'm sure you can get the idea.


Dawn also made some gift card holders in a little purse design. Pat and I have been playing with these little purses since buying our Crafter's Companion Ultimate, so these weren't new to us. I did, however, change it up a bit by making the purse into a treat holder instead of a gift card holder just by playing around with the scoring lines. Oh yeah, today I used my Michael's 40% off coupon to buy a Martha Stewart score board. The CCU is great but I wanted something with more scoring lines. I am enjoying it so far.
Speaking of Michael's, I'm so glad they accept Joann's coupons as well because I used my 40% off Joann's mobile coupon from the Mobiqpons app on my iPod Touch to pick up a K&Co paper stack. Poor cashier didn't know what to do when I showed her the coupon on my ipod and got nervous when her manager walked past but she accepted it anyway. I had a paper coupon in my purse as a back up just in case.
In case you're interested in the specifics for the purse treat bag, here they are:
Using SCAL and my Cricut, I cut the topper shape using the "09 Kutups" font. I made it 4.25" at the widest point and made sure to keep proportions when sizing. (I maybe should have made it a tad wider) Score 1/8" on each side of the center point of the topper along the 4.25" width. Using my CropADile, I cut a hole in the center of the score lines towards each end using the 1/8" size hole for the purse handle. Cut a length of ribbon, thread through holes and tie a knot on each end to secure.
The paper for the body of the purse is cut at 5.5" x 8.5". It is scored at 3.75" and 4.75" for the bottom of the purse. To make the purse shape, score a little tic mark 5/8" from each of the 4 corners on the top and bottom (short sides). Place card on trimmer aligning the tic mark and the first score line on the bottom of the purse, centered in the cutting groove, and cut. Repeat 3 more times.
Attach back of purse to back of topper using glue runner. You will need to use some type of closure of your choice such as Velcro or glue dots. You can get the general idea of how to put it together by watching this video by Dawn.
Saturday, May 01, 2010
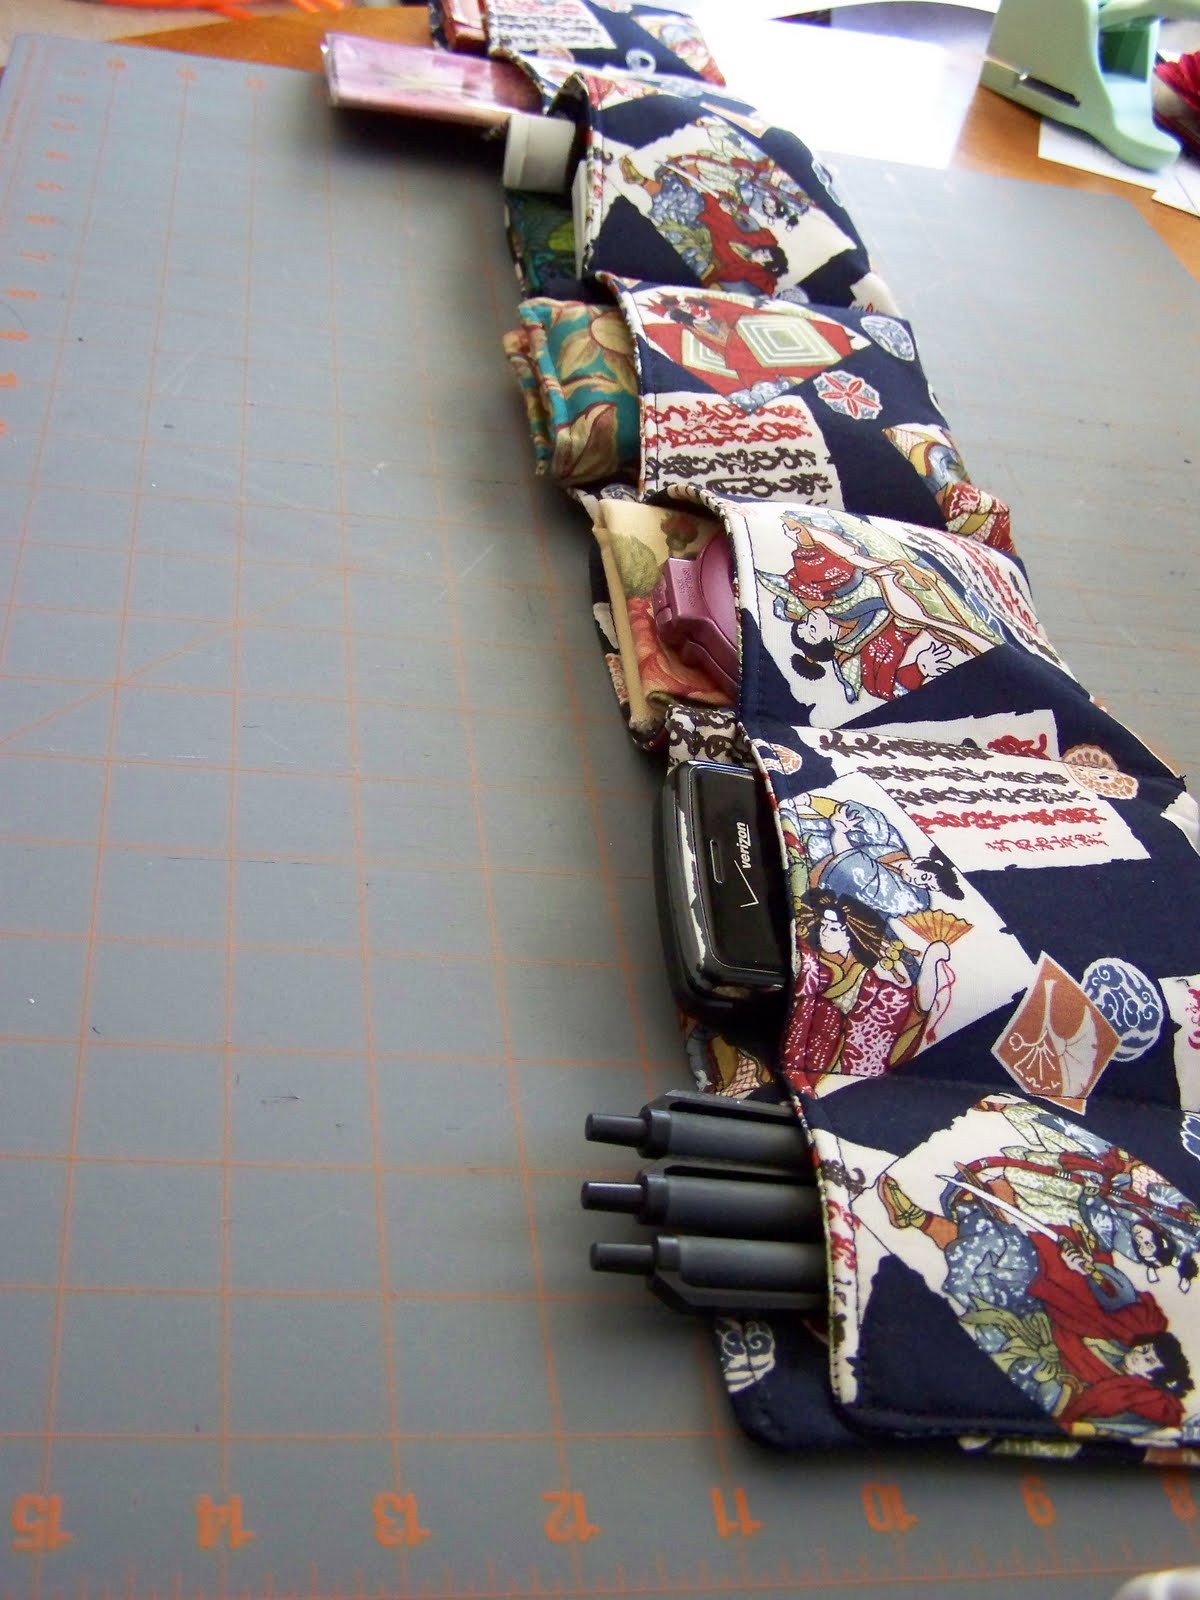
A Little Bit of Sewing! A Purse Organizer!
I can't blame this one on YouTube for a change! I forgot how much I wanted one of these until I saw a late night commercial for one. There are several tutorials online and they are pretty much the same. As usual, I couldn't sleep until I'd made one so here are the ingredients:
2 pcs fabric of choice - 10" by width of fabric
1 pc heavyweight interfacing - 10" by width of fabric
Marking pencil
Ruler
Usual sewing supplies
Lay fabric pieces right sides facing and lay interfacing on top. I've used a 5/8" seam allowance. Pin all around and sew up both of the long sides, leaving a 3" space for turning. Measure 36" and cut. Sew up both short sides. Turn right sides out. Tuck in ends of turning space and pin closed. Topstitch both long sides. Flip bottom long edge up towards top long edge, leaving a 1" space. Mark the following measurements from left to right: 3.5", 3.5", 4.5", 5", 5", 5.5", 6" to create pockets and pin in between to keep everything in place. Sew from top of pocket to bottom and backstitch at both top and bottom for strength. Sew up sides using a small (1/8") seam allowance and you're done! Enjoy your new purse organizer!
I've based my measurements on the large Purseket, although mine fits nicely in my pretty smallish purse. The website very generously gives you measurements for all of the sizes of their Pursekets.


2 pcs fabric of choice - 10" by width of fabric
1 pc heavyweight interfacing - 10" by width of fabric
Marking pencil
Ruler
Usual sewing supplies
Lay fabric pieces right sides facing and lay interfacing on top. I've used a 5/8" seam allowance. Pin all around and sew up both of the long sides, leaving a 3" space for turning. Measure 36" and cut. Sew up both short sides. Turn right sides out. Tuck in ends of turning space and pin closed. Topstitch both long sides. Flip bottom long edge up towards top long edge, leaving a 1" space. Mark the following measurements from left to right: 3.5", 3.5", 4.5", 5", 5", 5.5", 6" to create pockets and pin in between to keep everything in place. Sew from top of pocket to bottom and backstitch at both top and bottom for strength. Sew up sides using a small (1/8") seam allowance and you're done! Enjoy your new purse organizer!
I've based my measurements on the large Purseket, although mine fits nicely in my pretty smallish purse. The website very generously gives you measurements for all of the sizes of their Pursekets.


And finally, I made a little dust cover for my Cricut using one of my husband's old t-shirts. He wears a 2XL shirt. I slipped it over the Cricut and eyeball measured how much to cut off, including seam allowance. Since it's a tube, all I had to do was sew one seam. It's not pretty but it works very nicely.


Thursday, April 29, 2010
Toilet paper roll mini album


Oh boy! These little things are so much fun! I saw these on YouTube and had to make my own. My first album is so very basic and not nearly as embellished as some of the beautiful ones I've seen but for my first, I'm happy. Besides which, I made it at 1:30 a.m.!
As the title states, these are made of the inner cardboard core of the toilet paper roll. In this example I've used 4, though the way my family goes through toilet paper, I've saved enough for about six albums so far. First you have to flatten the rolls. This is harder than you'd think. These things have memory! I tried using a bone folder and even ran it through my Cuttlebug! This is the flattest I've been able to get them. I then covered the rolls with scrapbook paper and some little scrap embellishments I had been playing with earlier that evening. I tried to make things match but I was tired and just wanted to see what one looked like all done up. Apparently, not all toilet paper rolls are the same size but to make these I cut my paper at 5 1/4" x 6" and covered the rolls with 1/2" extra on each end to tuck inside the tube to finish the edges. I found it easier to do if I cut notches out of each side. Then I punched holes and inserted eyelets in the ends of the rolls for the book ring to go through. All that's left is your pictures, journaling (if you do that), and tags. I cut my tags on my Cricut using the SCAL program but you can easily just cut them out of cardstock by hand. I think mine measured 2 3/8" x 4". Just make sure you don't cut them too small or they'll fall right out of your album. I took two tags and glued them together for stability.
When I showed this to my husband, he thought they'd be great graduation invitations for our moms. He's so smart! That's why I married him!
I found great paper at my LSS in a masculine style in my son's school colors that I'm going to use. I think I'll make him one, too, since he's leaving for college shortly after graduation. I want him to remember what we look like!
In my next post, I'll show how I'm now making these without using the actual toilet paper rolls! It's not recycling, but I do like them better since they don't take any more work to make and they are flatter than the toilet paper rolls! You will be able to make a 4 tube album using only 2 pages of cardstock and 2 pages of scrapbook paper - 8 1/2" x 11" or 1 page each if they're 12" x 12". Even better!

Thursday, April 22, 2010
Old Settler's Beans
 The other day I was looking for something to cook for dinner and I happened upon a recipe for Old Settler's Baked Beans. It looked good but I wasn't so sure the family would go for it. It called for a lot of sugar and other than chili, everytime I tried to feed my lot some beans, they refused. Still, I was sure I wanted to try anyway. I tweaked the basic recipe and wanted to put down what I'd done so I don't forget for next time. There will definitely be a next time as my husband exclaimed twice (after having two servings) that they were really good.
Old Settler's Beans
2 lbs ground beef
1/2 lb bacon
1 lg onion, diced
1/3 cup brown sugar
1/2 cup ketchup
1/2 cup BBQ sauce
2 Tbsp prepared yellow mustard
1/2 tsp black pepper
1 1/2 tsp chili powder
1 - 15 oz can butter beans
1 - 15 oz can pork and beans
1 - 15 oz can chili beans
Brown bacon then add onion and ground beef. Drain. Add remaining ingredients except beans and stir until combined. Add beans and stir well. Transfer to crock pot and cook on low until ready to serve. We ate ours over hot rice! Yum.
Homemade paper flower embellishments

 The green flower was made using a dingbat font and cut out on my Cricut. The font is called 09 KutUps and I use it for almost all of the shapes I use for cardmaking. The cardstock started off white but I sprayed it with my homemade glimmer spray in a metallic green.
 This little purple carnation is made from a page from English Home magazine. The paper feels a bit heavier to me than your typical American magazine. I punched out 2" circles and pinked the edges. I think there are 7 layers. I scrunched all the pieces and then pinned them together in the center with a mini brad. I then misted the flower with my homemade glimmer spray in a lavender color and when it was completely dry, I touched up the edges with Stickles.
 The rest of the pictures show another tea bag holder card that I made and what it would look like if embellished with the flowers instead of the ladybug. I may just have to show pictures of the steps used to make these so I don't forget what I did!
Oh, of all the YouTube videos I saw, this one by Tracylovestoscrap is the one that made me want to try again.


Saturday, April 17, 2010
Baby Girl Tri Fold Shutter Card

 I'll be flying down to the Phoenix area tomorrow for a baby shower. This will be for the daughter of a family friend. I found these perfect K & Co stickers at Michael's this week for 40% off and the Imaginisce paper from http://www.kyandyland.com/, my LSS. It is made on basic cardstock from Joanns with a sentiment I found on Scrapbook.com. I love the way it turned out! It was so pretty that I didn't attach the gift cards to the front like I originally planned, so I attached them to the back of the card instead with homemade glue dots. I used a strip of the non-stick paper from a package of Zots and made little dots out of Aleene's Tack It Over & Over that I had to buy from eBay, since I can't seem to find it here in Las Vegas. I let them sit until they turned clear and they are perfect! So economical, too!
Friday, April 16, 2010
Tea Bag Holder Cards
My friends laugh at me now whenever I open a conversation with, "I was watching YouTube..." because it gets me into so much trouble (of the best kind) because I see so many things I want to do and usually don't fall asleep until I do them (at 2:00 am).
Well, I was watching YouTube last night and saw these tea bag holders by Dawn and thought they were the cutest things! I did, however, make mine a bit differently and here are the specifics:


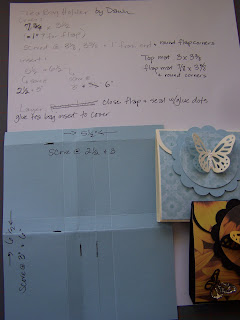 Tea Bag Holder
Cover:
7 3/4" x 3 1/2" (the extra 1" is for the flap I added)
Score at 3 1/8" & 3 5/8" then flip and score 1" from the other end and round the flap corners.
Insert:
5 1/2" x 6 1/2"
On the 5 1/2" side, score at 2 1/2" and 3"
On the 6 1/2" side, score at 3" and 6"
I follow Dawn's directions for assembly except that I glue the insert inside the cover rather than tie together with ribbon. I cut decorative paper and cardstock to cover the front and the flap then seal with glue dots.
I can see I need to do a better job of gluing the inserts as it looks as though the blue one is coming undone.
Well, I was watching YouTube last night and saw these tea bag holders by Dawn and thought they were the cutest things! I did, however, make mine a bit differently and here are the specifics:


Cover:
7 3/4" x 3 1/2" (the extra 1" is for the flap I added)
Score at 3 1/8" & 3 5/8" then flip and score 1" from the other end and round the flap corners.
Insert:
5 1/2" x 6 1/2"
On the 5 1/2" side, score at 2 1/2" and 3"
On the 6 1/2" side, score at 3" and 6"
I follow Dawn's directions for assembly except that I glue the insert inside the cover rather than tie together with ribbon. I cut decorative paper and cardstock to cover the front and the flap then seal with glue dots.
I can see I need to do a better job of gluing the inserts as it looks as though the blue one is coming undone.
Saturday, April 10, 2010
More homemade glimmer spray...even easier!


Tri fold shutter cards


 I covered this flower with my homemade glimmer spray! I used the clear pearl color but could have easily done the fuchsia pearl as well. This card was particularly easy since it wasn't double matted. I cut the pieces out on my Cricut then ran them through the Cuttlebug.
I have one more version of this card that I'd like to try and will post pictures later.
DIY Glimmer Spray

Boy, where to begin? 

 Since my last post, I have received my Crafter's Companion Ultimate and love it although I can now see that it has some limitations compared to the Scor-Pal for some things because it doesn't have as many score lines but I love that you can make so many projects without really doing much thinking. The measuring has already been done for me! I don't know yet if I'll ever use the embossing templates that come with it but like that they're there anyway.


 Since my last post, I have received my Crafter's Companion Ultimate and love it although I can now see that it has some limitations compared to the Scor-Pal for some things because it doesn't have as many score lines but I love that you can make so many projects without really doing much thinking. The measuring has already been done for me! I don't know yet if I'll ever use the embossing templates that come with it but like that they're there anyway.
I have also bought a Cuttlebug from HSN.com and love their exclusive raspberry pink edition. It came with so many embossing folders but I still have my eyes on a couple of others. This is an invaluable tool in my burgeoning card making endeavors!
So, now on to the DIY Glimmer spray! I found a cool little scrapbooking store in my neighborhood. Literally! It is a 1300 sq. ft. house in my neighborhood that has been converted into a store but you'd never know it from the outside. Anyway, I took a Cricut class there and got to experiment a little with some Glimmer Mist. I wasn't too sold on it then but when I researched it a bit I got more excited, especially when I found out how to make my own. This stuff is pricey at around $7.00 per 2 ounce bottle!!! So far I've made 4 colors but plan on expanding my collection and also trying other recipes.
How I made mine:
Fill a 2 ounce spritzer bottle about 2/3 full of rubbing alcohol
Squeeze in some pearlilzed acrylic paint (or regular acrylic paint with some pearl medium added to it)
That's it! Shake, shake, shake to keep it mixed as the pearl settles to the bottom and will clog up the works very quickly. I shake then spray, shake then spray and generously cover my item. I then blot with paper towels and dry with my blow dryer as I haven't bought a heat gun yet. This mixture costs just pennies compared to Glimmer Mist and your colors are only limited by your imagination. I chose to use rubbing alcohol rather than water because it dries faster, I think.
I would like to try a recipe I saw that combines alcohol, alcohol inks, and Ranger's Perfect Pearls. I just bought some Perfect Pearls and saw that my LSS has some Adirondak inks so I'm good to go.
Wednesday, March 17, 2010
Exploding box

 This morning I was watching some HSN that I'd taped on Monday because it's National Craft Month. I saw the Crafter's Companion Ultimate Craft Tool with Boards (item #264-023) and just had to have it! I've been wanting to make some of the exploding boxes I've seen all over the place. I even considered buying an SVG template for the Sure Cuts A Lot but now I'm glad I didn't. They're so easy and cool as heck! I kept watching the video over and over and went to my crafting area and made this box. The scalloped circle and flowers were cut on my Cricut and so was the digi stamp. I saw the coolest video on YouTube that showed how to do that. The box is a 12" x 12" sheet and the top is an 8 1/8"x 8 1/8" sheet. EASY! I can't wait to get my tool box! I'm just amazed at how quickly the projects come together. If you're interested in getting it, make sure you order #264-023 and not #364-395! They look identical but #264-023 has 54 more embossing templates and is only $5.00 more!
What's going in the box? I made some Apricot scones and some Iced Maple scones this morning and called two of my friends to come pick some up. They got two scones in each box. I wrapped the scones so that they can re-use their boxes if they want to.
Subscribe to:
Posts (Atom)