Lion Brand Hometown USA - Super Bulky Yarn
US Size 11 circular needle - Magic Loop Method
CO 56 sts
Round 1: *K2, P2* around
Round 2: P1, *K2, P2* around
Continue rounds 1 & 2 until desired height, then BO
Sunday, November 27, 2011
Friday, November 25, 2011
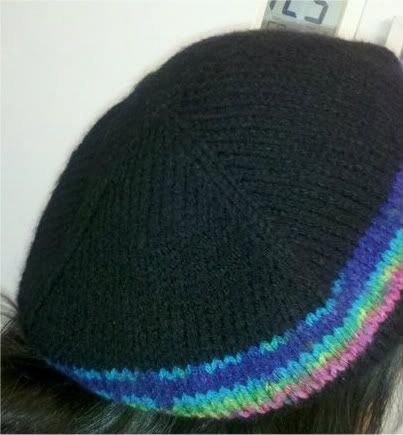
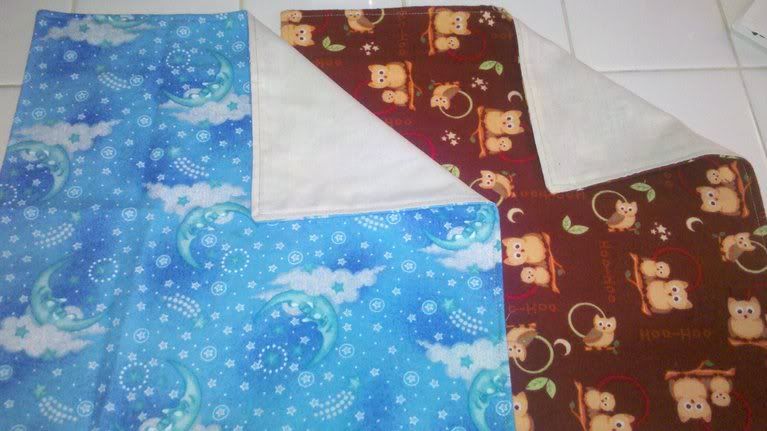
Top Down Knit Slouch Hat - just my notes, not a pattern
I just finished knitting a slouch hat for myself and wanted to post my notes so that I can make more of them just like it.
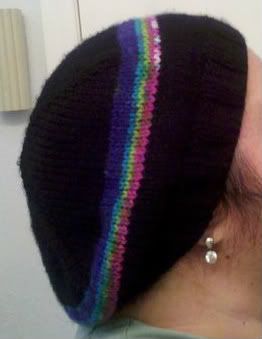
Top Down Knit Slouch Hat
Hat body US size 10 circular
Hat ribbing US size 7 circular
KFB=Knit in front and back of same stitch
YO=Increase one by doing a YO. **On next round, knit all YOs through the back loop to avoid making a hole.
Knit using either magic loop or two circular method
With larger needle CO 8 sts: CO 2, PM, CO 4, PM, CO 2. Put half of total number of sts on each needle and proceed with magic loop or 2 circular method.
Round 1: *KFB* around. 16 sts
Round 2: Knit
Round 3: *K1, YO, K2, YO, K1* around. 24 sts
Round 4: *K1, YO, K4, YO, K1* around. 32 sts
Round 5: Knit
Continue in this manner: *K1, YO, K X number of sts to last st before marker, YO, K1* until you have 120 sts total.
Make color changes as desired.
Knit until you have 8 1/2" from crown to needles.
Decrease round: *K3, K2tog* around. 96 sts
Change to smaller needles for ribbing. Knit K2, P2 or K1, P1 ribbing for 1 1/2 inches.
BO loosely. Use starting tail to sew up hole at the crown. Weave in ends.
*Edit: Not quite sure I like the 4 increase sections. Might try 8 so that it looks less square from the top.

Sunday, October 30, 2011
Our Friends' 25th Anniversary in Phoenix

Monday, October 24, 2011
Babycakes Cake Pop Maker

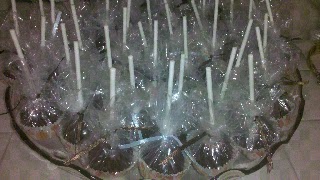 This is just a small sampling of the cake pops I made today. I gave a bunch away to a friend and also to a neighbor. Everyone loves them!
Wednesday, October 19, 2011

Tuesday, October 18, 2011
Halloween cake pops
Going to a party tonite and I offered to make these cake pops. My friend, Laura V hadn't heard of them before so I asked her to come over and help. What fun! The best part is having to "dispose" of the deformed ones! Also, dipping orange wedges into the leftover chocolate wasn't half bad.
These are made from a triple fudge cake mix, vanilla frosting, and chocolate candy melts with Halloween candy sprinkles. Yum!

Saturday, October 01, 2011
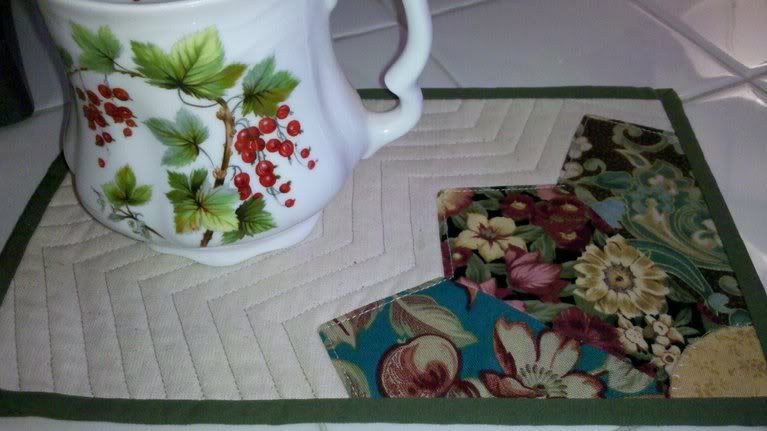
More mug rugs today
These things are addicting. They are great for trying new patterns and techniques in an immediately gratifying way. So small, so quick and very cute. I've wanted to try the braid pattern for a long time. Went into my scrap bag and pulled these fabrics out. They don't go together at all but I didn't want to waste good fabric if it didn't turn out. I'll use thinner strips next time. These were 2.5" wide. I especially like the hexie one. I started making some English paper pieced hexagons a couple of years ago, not having a grand plan for them. Glad I could use some here. The Dresden plate one was to practice my echo quilting more. The floral with the green & black borders was made to see what one looked like without binding and the others were to reacquaint myself with sewing bindings. What will tomorrow bring? If I don't join a mug rug swap, at least I've gotten a start on some Christmas presents :)


Friday, September 30, 2011
New mug rug
Sorry about the crappy picture. I took it with my phone because I was too lazy to get my camera out. I've been admiring a bunch of mug rugs on Flickr and felt to urge to whip one up today. This 6" x 9" mug rug was made of a bunch of "firsts" for me: first applique, first dresden plate, first echo quilting, first single fold binding. Since I've never done a dresden plate before, I didn't have a template so I just made my own. It was a rather large size but it was okay. I think I made it 1 1/2" at the bottom x 3" at the top x 5" tall. Now I know that most dresden templates are usually much narrower but I don't think I did so bad on my first try. I really wanted to try my hand at echo quilting and had read about using a single fold binding because it is less bulky on such a small project. I will definitely do the echo quilting again but I felt that this type of binding was more fiddly than a double fold binding and wasn't any easier to do. In fact, I felt it was a bit harder and I wasn't happy with the corners on the back. Oh yeah, I tried a new end joining technique on the binding which worked well. I'll have to try it again! I should have put a little pocket on the mug rug for either a spoon or a tea bag. Next time! I love using up scraps this way. I used hardly anything at all.
Not sure if I'll keep this one or save it for a gift or swap. I really am proud of it even though it's not very much of anything...except a bunch of firsts. Dang it! I'll probably keep it now!
Monday, September 26, 2011
Wool dryer balls

I didn't even know about wool dryer balls until the other night. Apparently, they're supposed to replace fabric softener sheets in the dryer, speed up drying time, and fluff up your laundry. They might even reduce static cling unless you live in a dry climate (like Las Vegas!) and don't mix synthetic and natural fibers. There are a few sellers on Etsy that offer them. I was looking to join a swap on Craftster.org and kept seeing these pop up in the swap packages. My curiosity was piqued. I got out a skein of good old Red Heart acrylic for the core and 100% wool for the outer balls and started winding. I wrapped the core to 7" in diameter, cut that yarn and then started winding the 100% wool until each ball was 9" in diameter. I then took the yarn end, attached a yarn needle and buried the end deep inside the ball. I managed to get 6 balls out of my wool. I put the first ball into the toe of a knee high stocking and tied a knot close to the ball. I continued like this until I got all 6 balls into that stocking. They went into the washer with a load of laundry on a hot/cold cycle with some detergent. It took 3 cycles for them to felt to my satisfaction but now the yarn is completely felted and won't unravel at all.
How are they in action? I think they're neat! I think they've cut my drying time by 20 minutes. They made my towels and blanket fluffy. They may even help get wrinkles out but I'll have to test this theory some more. I don't know if I'm 100% sold on not using fabric softener. I miss the smell. I did try one load of clothes without fabric softener and it came out just fine. I also read that you can add essential oil to the balls and I may try that sometime. I know for sure that I'll be making these as Christmas gifts!
Unpaper towels
Have you heard of unpaper towels? I had but didn't pay much attention until joining a frugal living swap this weekend on Craftster. Some of the swappers in previous swaps gave these as part of their packages. I don't think we go through a large amount of paper towels but I have been giving some thought to cutting back and have been using my dish towels to clean more things where I would have grabbed a paper towel in the past. There are some things I refuse to use cloth to clean up (pet poop). I did a Google search and was amazed at how many people are into this! I just ordered some birdseye cotton from a seller on Etsy so that I can make a bunch of these.
I made a few of these last night using cotton flannel on one side and unbleached cotton muslin on the other. I just wanted to try out the concept. I am even thinking that these will make great casual, everyday napkins! The only downside? They're so cute that I don't want to get them dirty! I already have more cut out and ready to sew in a brown/cream/black batik and black flannel. Can't wait to get started on those!
DIY Plastic bag dryer rack.
I've been coveting one of these for a little while since I saw it on Amazon.com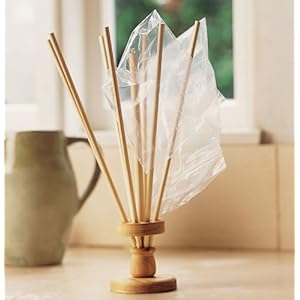
I even asked my husband to make one of these for me.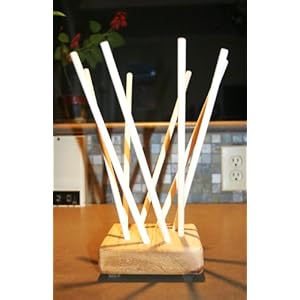
I couldn't wait. I'm baking a loaf of bread and wanted to reuse a plastic baggie to store my bread in. I knew my husband had some dowels in his workshop and I just helped myself to two of them. I don't know what their diameter is (they're about the same diameter as pencils) but they were 3 feet long. I knew I needed them on the long side to stick into a vase I got as a gift so I cut them in half. Voila! A plastic bag dryer that didn't cost me a dime!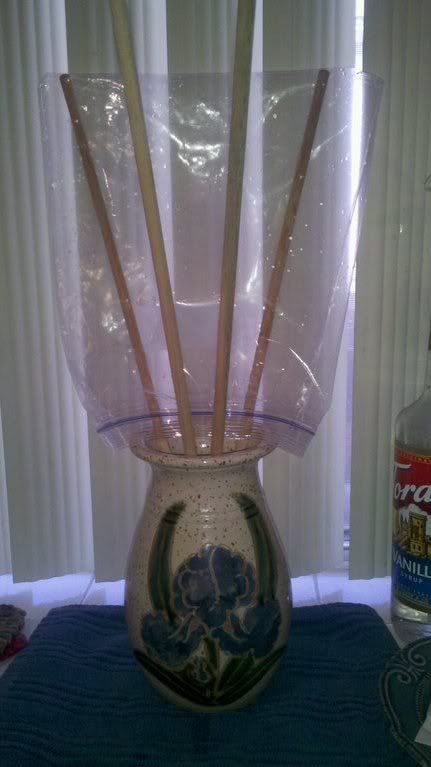 My husband said that because they're coming into contact with food containers, I should finish the dowels with a foodsafe wax or oil. I'll let him do that for me. He is the woodworker in this house, after all.
I know...it's not rocket science but I love it when I can get what I want without spending anything, or very little. It's like a game. Wanna play?
I even asked my husband to make one of these for me.
I couldn't wait. I'm baking a loaf of bread and wanted to reuse a plastic baggie to store my bread in. I knew my husband had some dowels in his workshop and I just helped myself to two of them. I don't know what their diameter is (they're about the same diameter as pencils) but they were 3 feet long. I knew I needed them on the long side to stick into a vase I got as a gift so I cut them in half. Voila! A plastic bag dryer that didn't cost me a dime!
My husband said that because they're coming into contact with food containers, I should finish the dowels with a foodsafe wax or oil. I'll let him do that for me. He is the woodworker in this house, after all. I know...it's not rocket science but I love it when I can get what I want without spending anything, or very little. It's like a game. Wanna play?
Saturday, September 17, 2011
So much to show, but I can't :(
I've been busy crocheting potholders for my Christmas stash, knitting cable cup cosies for my Etsy shop, sewing lavender filled dryer sachets and recycled t shirt shopping bags for myself, doggie poo bag holders for my sister, singed edge satin & organza flowers for an upcoming wedding, and a few more things I can't remember. Only problem is that I haven't taken pictures of any of them yet.
Yesterday, after sewing and filling 10 lavender dryer sachets, I noticed a twinge in my left shoulder/rotator cuff that turned into much more than a twinge by the end of the night. It's very painful and I type this very slowly while wearing an ice pack.
I'll try to get pictures of these goodies up as soon as I can.
Thursday, August 04, 2011
Tazo Shaken Iced Passion Tea Lemonade for 25 cents????

Brew a 10 oz cup of the Tazo Passion tea with my Keurig
Pour it over a full 24 oz cup of ice
Add some simple syrup and some pink lemonade Kool Aid syrup (1 pkt pink lemonade Kool Aid, 1 cup water, 1 cup sugar)
Put on a lid and shake. Add a straw and enjoy.
So simple...why pay $3.00 ever again?
Saturday, June 11, 2011
Today's tea cozy

Pattern stitch: multiple of 5 + 2
Row 1: P2, *sl 1 as if to K, K2, PSSO, P2* (repeat from * to *)
Row 2: K2, *P1, YO, P1, K2* (repeat from * to *)
Row 3: P2, K3 to end
Row 4: K2, P3 to end
Make 2 on US size 8 needles
For my 3 cup tea pot I CO 42 sts, knit 2 rows in garter stitch then worked each piece until I had 10 rows of completed mock cables. I finished with 2 rows in garter stitch then cast off. I made two long chain drawstrings and wove them in and out of the eyelets made by the mock cables in both the top and bottom of cozy. I also seamed up the sides, leaving room for the spout and handle. Worked in ends. Done!
Oh yeah, I did finish the other knitted pleated cosy. It's the turquoise/lime green one in the back. I'm making a third one now. Maybe my sister needs one for her naked tea pots! I'll make sure to bring some knitting along to Hawaii with me. Maybe I'll finally be able to make it to an Aloha Knitters knit nite this time.
Thursday, June 09, 2011
Soooo homesick right now!

Friday, June 03, 2011
New tea cozies or new tea cosies, however you want to spell them.

The cable knit one in the front is made without a pattern. I've been making so many cabled cup cosies that the cable is second nature to me now. I just CO 39 sts per side on size 8 needles and made two identical pieces just a bit taller than my pot. There are 3 purl sts on either side of the 9 st cable. I made a series of 5 buttonholes on the top before casting off to run the tie through, seamed up both sides, leaving room for the spout and handle, and done. So easy!
Friday, May 06, 2011
Reuse your Keurig KCups and Save Money!
I'm tight with my family's money. I'm cheap when I need to be and strive to be a lot more frugal because I want to remain a stay-at-home mom. However, I love my coffee and tea. My husband and I love our Keurig but I don't love how much those little K Cups cost and I really enjoy drinking my own coffee. I'm lucky enough to have some great Kona coffee that my friends brought to me from back home in Hawaii. So what's a tight, cheap, and frugal woman to do? Reuse my KCups, that's what!
Since I first got my Keurig coffee brewer, I was on a mission to figure out how to enjoy it more cheaply. I started off by rinsing out the used coffee grounds, letting the filters dry, then refilling with my own coffee and covering the top with Glad Press N Seal or the My-Kap lid. The My-Kap leaked all over the place so that was disappointing but the Glad Press N Seal worked wonderfully until the filters finally failed. Now what? Figure out a way to make a new filter. I actually got the idea of paper replacement filters on the My-Kap web site. They give full instructions on how to do this with Melitta cone filters. I made up my own method using regular basket filters that I've already posted about on this blog. However, these filters sometimes failed resulting in coffee grounds in our cups. Not acceptable!
For a couple of years, I have been using reusable cotton muslin filters, that I created, to make tea. Why couldn't I use this same idea to make reusable filters for my Keurig? Why not! So I did! I've been using them over and over for a couple of months now and am so excited that I couldn't keep the idea to myself. I wanted to give them a chance to fail so I could fix them before I released them, but so far I haven't had a single problem at all! In fact, they're working so perfectly. No grounds in my coffee, the needle that punctures the bottom of the KCup does not puncture the cloth, the coffee isn't weak, the filters are so easy to use and clean. These filters have also given me another opportunity to try the My-Kap lids in conjunction with Glad Press N Seal with very satisfactory results. I've also tried using them with just the Glad Press N Seal and a polyurethane hair elastic band with great results as well.
Oh, and they work wonderfully with the My K Cup attachment that Keurig sells. A lot of people complain that this attachment makes weak coffee because of the way the filter basket is made. The coffee is forced out of the sides of the basket rather than down the center like the original K Cups. My filters solve this problem, too! In fact, because you don't use the filter basket, only the cloth filter, you can put more coffee into the attachment, the coffee is forced down the center of the cloth filter, resulting in stronger, more flavorful coffee!
 I've listed my reusable K Cup filters in my Etsy store. I hope this helps others who want to reuse their K Cups, too!
Since I first got my Keurig coffee brewer, I was on a mission to figure out how to enjoy it more cheaply. I started off by rinsing out the used coffee grounds, letting the filters dry, then refilling with my own coffee and covering the top with Glad Press N Seal or the My-Kap lid. The My-Kap leaked all over the place so that was disappointing but the Glad Press N Seal worked wonderfully until the filters finally failed. Now what? Figure out a way to make a new filter. I actually got the idea of paper replacement filters on the My-Kap web site. They give full instructions on how to do this with Melitta cone filters. I made up my own method using regular basket filters that I've already posted about on this blog. However, these filters sometimes failed resulting in coffee grounds in our cups. Not acceptable!
For a couple of years, I have been using reusable cotton muslin filters, that I created, to make tea. Why couldn't I use this same idea to make reusable filters for my Keurig? Why not! So I did! I've been using them over and over for a couple of months now and am so excited that I couldn't keep the idea to myself. I wanted to give them a chance to fail so I could fix them before I released them, but so far I haven't had a single problem at all! In fact, they're working so perfectly. No grounds in my coffee, the needle that punctures the bottom of the KCup does not puncture the cloth, the coffee isn't weak, the filters are so easy to use and clean. These filters have also given me another opportunity to try the My-Kap lids in conjunction with Glad Press N Seal with very satisfactory results. I've also tried using them with just the Glad Press N Seal and a polyurethane hair elastic band with great results as well.
Oh, and they work wonderfully with the My K Cup attachment that Keurig sells. A lot of people complain that this attachment makes weak coffee because of the way the filter basket is made. The coffee is forced out of the sides of the basket rather than down the center like the original K Cups. My filters solve this problem, too! In fact, because you don't use the filter basket, only the cloth filter, you can put more coffee into the attachment, the coffee is forced down the center of the cloth filter, resulting in stronger, more flavorful coffee!

Monday, May 02, 2011
New reusable tea filter/infuser
I don't know why it's taken me this long to put these up in my Etsy store but they're finally there. I have been using them for a couple of years now and they're great! Very inexpensive to make or buy, so easy to use, easy to clean, portable, eco-friendly, and make really great tasting tea. Sure, disposable "sack" type filters work well but I'm glad I don't have to worry about running out. I love the idea that I can use these over and over. I'm going to try and make coffee in one, too. Not the same one I make tea in, mind you.
Every time I see little tea balls or spoons, I can't help but think that even though they're cute, they don't make the most of the tea leaves that are put into them. They don't have room to bloom and impart their maximum flavor. These cloth infusers give the leaves so much room to move, it's almost like they're swimming around in my cup. It's so cool to see how big, open, and fluffy the tea leaves are that come out of them when I'm done brewing. Ooooh, I need a picture of that! Okay, I'm back. Had to get a picture of that! LOL I know I'm biased, but they're great!


 |
| One of my older filters...they're prettier now! |
 |
| Before - 2 tsp Abundant Berry loose leaf tea |
 |
| After |
Wednesday, April 06, 2011


Subscribe to:
Posts (Atom)