
Sunday, March 22, 2009


Double thick single crochet potholders
This past Monday, a very nice lady approached me when she noticed one of my crocheted flowers. I gave one to her and in exchange she showed me a stitch I had never come across in my 35+ years of crocheting! It is made by crocheting into the back loop of the current row and a loop of the previous row at the same time. This produces a single crocheted piece that is double in thickness compared to a regular single crochet. She then gave me 3 potholders that she crocheted this way. How nice! I was happy to share my treasures with Leah and Steph. Unfortunately, mine now sits next to my chair, partially dismembered because I forgot how the potholder was made by the time I got home. Thank God for the sample because now I can share it with you!
Mine is made with a size "H" crochet hook and two colors of Lily Sugar 'N Cream cotton.
Chain 26. Turn and single crochet in the 2nd ch from hook and in each ch across, which makes 25 single crochets. At the end of every row, ch 1 then turn.
From here to the end of the potholder, put hook into the back loop of the current row and the corresponding loop from the row below. Make sure you continue to have 25 sts every row. I found the last stitch to be the most difficult to make because the stitch from the previous row is a bit tight.
When the piece is of the desired length, you will put the hook in the the two loops as usual, however, you will make a slip stitch instead of a single crochet. This will finish off the top of the piece nicely. Create a hanging loop if desired by chaining 7 or 8 and attaching next to beginning chain. Chain 1, turn and single crochet into the loop. Fasten off and weave in ends.
I did some baking this weekend and this potholder was sufficiently thick to protect my hands from the heat.


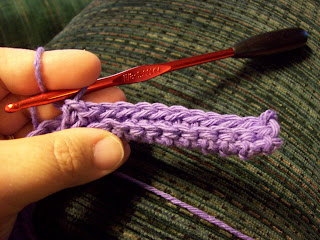


Mine is made with a size "H" crochet hook and two colors of Lily Sugar 'N Cream cotton.
Chain 26. Turn and single crochet in the 2nd ch from hook and in each ch across, which makes 25 single crochets. At the end of every row, ch 1 then turn.
From here to the end of the potholder, put hook into the back loop of the current row and the corresponding loop from the row below. Make sure you continue to have 25 sts every row. I found the last stitch to be the most difficult to make because the stitch from the previous row is a bit tight.
When the piece is of the desired length, you will put the hook in the the two loops as usual, however, you will make a slip stitch instead of a single crochet. This will finish off the top of the piece nicely. Create a hanging loop if desired by chaining 7 or 8 and attaching next to beginning chain. Chain 1, turn and single crochet into the loop. Fasten off and weave in ends.
I did some baking this weekend and this potholder was sufficiently thick to protect my hands from the heat.


Saturday, March 21, 2009
Sewing on Friday, yippee!


What do you do when you have two kids at home sick? Well, I spent a few hours sewing! The big kid had an upset tummy and the little one is getting over the flu. They were both parked in front of their TVs and didn't even notice I was in another room.
I've been wanting to make something out of these quilt squares I bought last summer when I was back home in Hawaii. The obvious thing would have been a quilt but I wasn't in the mood to devote that much time and I really have been wanting to make a runner for my coffee table anyway. I chose to make it very simple, using just three of the five prints available in my pack, backing it with microfleece and choosing to turn and topstitch rather than sew a binding on it. Also, as far as quilting it, I chose to machine tie it. I thought it might be neat to tie buttons on every intersection but it would have created an uneven surface upon which to rest a drink and I didn't want that.
After I finished with my table runner, I decided to make a little runner for the boys' bathroom to place their toiletries upon. Anthony vetoed it but as soon as he's not home I'll get my way!
Next, I wanted to treat myself to what was left of my Mary Englebreit fabric. I had made some pads for my Etsy shop out of it and always loved it because of the teacups and teapots, but hadn't made anything out of it for myself. I had just enough for two new pads and a matching zippered pouch. I love them! I swear, next time I see this fabric, I'm buying a few more yards of it and treat myself to a few more things.


Tuesday, March 17, 2009


Saturday, March 14, 2009
PG Tips Commercial with Monkey & Al
Love this commercial!
How about those outtakes?
Wallace & Gromit for PG Tips
How about those outtakes?
Wallace & Gromit for PG Tips
Keeping my tea warm and a new round ripple


I was reading Steph's Cup of Tea today and in a previous post she asked if people drink tea at work and how they do it. That post reminded me of Betty, a very lovely, older British lady I used to work with. She made tea in her favorite rose covered cup several times a day and stashed her biscuits in her desk. As far as I can remember, she was our lone tea drinker. I was a coffee drinker in those days but I still loved watching her drink her tea. Betty resembled Maxine (from Hallmark cards) in both appearance and demeaner, but I liked her and she liked me. It was an honor as she didn't like a lot of people.
This got me thinking about how I used to keep my large mug of coffee warm at my desk and that I tried keeping a pot of tea warm like this awhile ago. However, I forgot the most important thing about keeping a pot of tea warm...preheating the pot! Very important! So, today I got out my two little warmers (one is for candles and the other for keeping food warm) and redid my experiment. After over an hour, both the pot and lidded cup's contents are at a nice drinkable temperature, not too hot. I didn't want to waste the water from my tea kettle for preheating the pot, so I filled it with tap water and heated it in the microwave for 3 minutes with a chopstick in it to prevent superheating. Superheated water is a pheonomenon where water is past boiling temperature but hasn't actually come to a rolling boil. This is extremely dangerous as it can cause 3rd degree burns to whichever body part happens to touch the water. Watch it here and here.
I just posted a picture of my new ripple over at the No End In Sight Ripple Along site. Geez, I haven't been there for a long while. I'm making it for my friend, Leah. It won't be a secret from her for long as I will be working on it in front of her on Monday. If you haven't already guessed, she's the same Pittsburgh Steelers fan I made the flowered hat and scarf for a little while ago. I hope she likes it.

Sunday, February 15, 2009
Starbucks London Fog Latte & Hat/Scarf Set

I have a love/hate relationship with Starbucks. I think they are way overpriced for what you get but I do enjoy a Green Tea Frappuccino on a hot summer day (I'd rather not know what is really in it). I get some satisfaction knowing how people learn to make their own versions of Starbucks favorites, which is what I tend to do because I can't stand spending $2.00 plus for a cup of tea from a bag and $4.00 for a cappuccino that I can make at home for pennies! Call me cheap, I don't care.
Take their London Fog Latte. All it is is a double-sized Earl Grey teabag, steamed milk, and a few pumps of vanilla syrup. How did I make it at home? I feel stupid explaining it as it's too easy. I steeped a cup of Earl Grey tea double strength, frothed some milk with my espresso machine and added some of my homemade vanilla bean simple syrup. I've also renewed my love affair with my Breville Cafe Roma. For the past two nights, I've been using my stove-top Bialetti Mukka Express to make my husband and me cappuccinos after dinner. I made the mistake of saying something about making them on the stove and he asked why, since he bought me this expensive machine that I haven't used in awhile. So this morning I decided to make myself a cappuccino with my machine. So easy to make, so easy to clean, very yummy! This is how I got to thinking about the London Fog Latte. Although I like Earl Grey well enough, I wonder what other flavored teas would taste good like this? I have a Caramel tea and a Blueberry Maple tea I'd like to try.


I know the Super Bowl is over, but I have a friend who is a big Steelers fan. I don't get to see her very often and we miss seeing eachother at our bi-monthly knit nites. I made her this set plus a beret in a very soft periwinkle blue yarn. Hope she likes them.

Now I can get back to watching the BBC series Ballykissangel on Netflix via XBox Live. Being able to watch movies and such instantly from Netflix is so worth the monthly fee. I consider this is what I'm paying for and getting my movies in the mail is just a 'bonus'.
Thursday, February 12, 2009
Everyday Dal
Being new to Indian cuisine, I wanted to start making the most basic foods first. I tried a yellow dal, eaten with roti and rice when I had lunch with my friend Melanie. Even though we had a couple of chicken dishes, one of which was chicken korma, my favorite was the dal and roti. I've been wanting to make it ever since. The dal recipes I've seen are either made from lentils, split peas, mung beans, kidney beans, or a combination of each. In my Filipino culture, we have something that is very similar to mung dal called balatong. Besides pinakbet, it's one of my favorite meals that my mom has to cook whenever I'm visiting her. Dal is a good substitute until I can get my next balatong fix.
I found this recipe for Everyday Dal in My Bombay Kitchen by Niloufer Ichaporia King
1 cup red lentils (masur dal), husked split pigeon peas (tuvar dal), or mung beans (mung dal)
1/2 tsp ground turmeric
1/2 tsp (or more) salt
1 onion, quartered (optional)
1 green chile (optional)
4 cups (or more) water
1 to 2 Tblsp ghee or butter
1/2 tsp cumin seeds
2 to 4 cloves garlic, minced
1 to 2 Tblsp finely chopped onion or shallot (optional)
Pick over the dal to remove stones and chaff. Rinse the dal and transfer to a pot; add the turmeric, 1/2 tsp salt, quartered onion, and chile, if using, along with at least 4 cups water. Bring to a boil; reduce the heat and simmer, partly covered, until the dal is tender. (Masur and mung dals soften in about half the time it takes to cook tuvar dal, which needs a good 45 minutes to 1 hour.) Watch out for overboiling, even with the heat down. It's no big disaster, but it makes an awful looking mess.
When the dal is soft and mushy, pass through a sieve or a food mill, or liquefy in a food processor or with an immersion blender, which saves you the trouble of pouring and transferring. The texture of the dal should be thick, smooth, and pourable. Taste for salt.
To finish, heat the ghee in a small skillet over medium heat. Sizzle the seeds, garlic, and onion, if using, until the garlic begins to brown around the edges and the seeds start to crackle. These sizzling seeds and garlic are known as vaghar in Gujarati, tarka in Hindi. Tip the vaghar into the dal and stir.
I found another good looking recipe with photo here.
I found this recipe for Everyday Dal in My Bombay Kitchen by Niloufer Ichaporia King
1 cup red lentils (masur dal), husked split pigeon peas (tuvar dal), or mung beans (mung dal)
1/2 tsp ground turmeric
1/2 tsp (or more) salt
1 onion, quartered (optional)
1 green chile (optional)
4 cups (or more) water
1 to 2 Tblsp ghee or butter
1/2 tsp cumin seeds
2 to 4 cloves garlic, minced
1 to 2 Tblsp finely chopped onion or shallot (optional)
Pick over the dal to remove stones and chaff. Rinse the dal and transfer to a pot; add the turmeric, 1/2 tsp salt, quartered onion, and chile, if using, along with at least 4 cups water. Bring to a boil; reduce the heat and simmer, partly covered, until the dal is tender. (Masur and mung dals soften in about half the time it takes to cook tuvar dal, which needs a good 45 minutes to 1 hour.) Watch out for overboiling, even with the heat down. It's no big disaster, but it makes an awful looking mess.
When the dal is soft and mushy, pass through a sieve or a food mill, or liquefy in a food processor or with an immersion blender, which saves you the trouble of pouring and transferring. The texture of the dal should be thick, smooth, and pourable. Taste for salt.
To finish, heat the ghee in a small skillet over medium heat. Sizzle the seeds, garlic, and onion, if using, until the garlic begins to brown around the edges and the seeds start to crackle. These sizzling seeds and garlic are known as vaghar in Gujarati, tarka in Hindi. Tip the vaghar into the dal and stir.
I found another good looking recipe with photo here.
Sunday, February 01, 2009
Sensa

I've been battling my weight forever and have tried many diets in the past. I got to the point where I just gave up and said to myself that this is the way I am. While I finally felt free of the stress of dieting, my weight was like having an elephant in the room. Everyone can see it but no one is willing to address it. My friends are so sweet and many of us have the same problem. Usually, we support eachother but sometimes we're eachother's worst enemies since we all like to eat and we enjoy socializing around food.
Last week, I was watching HSN and they were introducing a new product called Sensa. Honestly, it sounds too good to be true but at their introductory price and their 30 day money back guarantee, I felt like I a) had nothing to lose but weight and b) I had to prove it DIDN'T work! I'm hoping that with the use of Sensa, I can still enjoy going to lunch with my friends but I'll have a secret weapon.
I just received my kit and started today. I can already tell that my biggest problem will be to remember to use it. It somehow works with the brain to trigger the sensation of satiety. All I'm supposed to do is sprinkle it liberally on my solid/semi-solid foods and over time I'm supposed to feel full faster and eliminate the need to snack. We shall see!
Sunday, January 25, 2009
Make your own slider burgers
Have you been tempted to buy those special pans to make your own slider burgers? If you have a grill pan (or even if you don't), you probably have everything you need to make some sliders at home, for a fraction of the cost of going out to Chili's or TGI Fridays.
I just baked a batch of my homemade dinner rolls to use as buns and prepared my hamburger meat like I normally would. Basically, here is the recipe:
Makes 16 mini burgers
2.25 lbs. ground beef
1 packet dry onion soup mix
2 Tbsp. A-1 steak sauce
garlic powder, to taste
black pepper, to taste
1/2 chopped onion to sprinkle in the bottom of the pan.
To form patties, fill a 1/4 cup measuring cup with hamburger meat and empty onto a plastic lined cutting board (for easy clean-up). Pat meat down to form patty. Heat grill pan on medium heat, sprinkle onions onto center of pan, place 4-5 patties in center of pan and place grill press onto patties. Cook until brown on bottom and flip over. Patties are pretty much cooked at this point but I like to brown both sides. Slice rolls in half and place patties, cheese, and additional condiments, as desired. Enjoy!


I just baked a batch of my homemade dinner rolls to use as buns and prepared my hamburger meat like I normally would. Basically, here is the recipe:
Makes 16 mini burgers
2.25 lbs. ground beef
1 packet dry onion soup mix
2 Tbsp. A-1 steak sauce
garlic powder, to taste
black pepper, to taste
1/2 chopped onion to sprinkle in the bottom of the pan.
To form patties, fill a 1/4 cup measuring cup with hamburger meat and empty onto a plastic lined cutting board (for easy clean-up). Pat meat down to form patty. Heat grill pan on medium heat, sprinkle onions onto center of pan, place 4-5 patties in center of pan and place grill press onto patties. Cook until brown on bottom and flip over. Patties are pretty much cooked at this point but I like to brown both sides. Slice rolls in half and place patties, cheese, and additional condiments, as desired. Enjoy!


Saturday, January 24, 2009
My first sock bun!


What do you do when you can't sleep? I watch videos on YouTube. It was 4:30 a.m. and I found videos on styling long hair. One of them mentioned a "sock bun" and since I'm the curious type, I just had to do more research and, finally, make my own! What is a "sock bun"? It is a form over which you make a bun-type hairstyle and it's made from...wait for it...socks! Mine was made with two of my husband's discarded tube socks (I keep them in a basket by my sewing machine with other discarded clothing) and two new jet black knee high stockings. I used two socks because I wanted my bun form to be large and firm. What you do is cut the toes off of the socks and stockings, put one tube sock inside the other and roll them down to form a donut shape. Put one of the knee highs with the elasticized top through the center of the donut and roll the knee high around the donut. Do the exact same thing with the second knee high to make the donut more opaque and completely cover the whiteness of the tube sock. If you have blonde hair, you'd probably use a nude colored sock instead of black. This is so that if my hair doesn't completely cover the donut, it won't be so obvious. I've read that if you don't cover your sock with a piece of stocking, your hair will get really tangled. I didn't want to find out first-hand!
I know my first sock bun is kinda messy but my second one was much better. I now know that this type of bun is very popular with ladies in the military and performance artists like figure skaters and dancers. I can see myself wearing my hair like this a lot.
Here are a couple of the videos that got me started:
Wednesday, January 21, 2009
My new glass tea kettle
 Did I need another kettle? No. Why then did I feel compelled to buy this one? I just loved the idea that I could watch the five stages of tea water that Angela at Tea With Friends blogged about. In fact, this is the same kettle she uses. You can't beat the price at $9.95 from KMart. Also, I have made my masala chai in this kettle and it works very well. I made my chai for some friends last week in my usual saucepan on the stove but, as usual, when I pour it into cups, I lose about 1/3 down the drain. Now, I can pour out the chai very neatly and not lose a drop. I just remove the whistling lid while brewing the tea (before adding milk) so that it reduces a bit. It's easy to clean, too. Perfect!
Tuesday, January 06, 2009
Bialetti Mukka Express
Cruising YouTube can be very dangerous for me. I forget what I was looking at but somehow I came across a video for this cappuccino maker. What came next? EBay, of course! I placed a bid on three of them! I actually won one and it's in the mail as we speak.
Ummm, why did I buy this? I've had less than 10 cups of coffee in the past year! It just looked so good that I couldn't help myself. My mom always said that I have no sales resistance. Isn't that the truth? Anyone have a bridge for sale?
*UPDATE*
January 10, 2009
I must tell you that I wasn't totally sold on the Bialetti Mukka Express before today. I have a super-wazoo Breville Cafe Roma that I got for Christmas a couple of years ago that makes excellent cappuccino. I'm not sure why I had to have the Mukka except that I was so curious after watching the YouTube videos. I wouldn't have bought the Mukka if I had to pay full price but I got it for such a great price on eBay that I had a hard time passing it up. If you want my honest opinion, if you want a good cup of cappuccino and not spend $300 on an espresso machine, you can get these two products (I've had both of these!) at a much better price and be just as happy: the Bodum Frother and a regular stove top espresso pot. You just don't get the "cool factor" that the Mukka has! I loved my Bodum frother until I broke the glass carafe. I bought it at Ross for less than $10.00 but haven't seen one there again. You can find the espresso pots at Ross as well for around $10-15.
The instructions for the Mukka said that the pot works better the more you use it and it was right! I made 4 pots of cappuccino today and they all turned out fabulous! I think it was better today because I was using whole milk instead of 2% so my milk was so rich and frothy. Just make sure you run water through the top of the pot right after you make coffee or else it'll be a bit harder to clean. Also, don't try to unscrew the bottom of the pot without removing the pressure valve on the top...you'll hurt yourself trying to unscrew it. It won't loosen if there's still pressure in the bottom.
Ummm, why did I buy this? I've had less than 10 cups of coffee in the past year! It just looked so good that I couldn't help myself. My mom always said that I have no sales resistance. Isn't that the truth? Anyone have a bridge for sale?
*UPDATE*
January 10, 2009
I must tell you that I wasn't totally sold on the Bialetti Mukka Express before today. I have a super-wazoo Breville Cafe Roma that I got for Christmas a couple of years ago that makes excellent cappuccino. I'm not sure why I had to have the Mukka except that I was so curious after watching the YouTube videos. I wouldn't have bought the Mukka if I had to pay full price but I got it for such a great price on eBay that I had a hard time passing it up. If you want my honest opinion, if you want a good cup of cappuccino and not spend $300 on an espresso machine, you can get these two products (I've had both of these!) at a much better price and be just as happy: the Bodum Frother and a regular stove top espresso pot. You just don't get the "cool factor" that the Mukka has! I loved my Bodum frother until I broke the glass carafe. I bought it at Ross for less than $10.00 but haven't seen one there again. You can find the espresso pots at Ross as well for around $10-15.
The instructions for the Mukka said that the pot works better the more you use it and it was right! I made 4 pots of cappuccino today and they all turned out fabulous! I think it was better today because I was using whole milk instead of 2% so my milk was so rich and frothy. Just make sure you run water through the top of the pot right after you make coffee or else it'll be a bit harder to clean. Also, don't try to unscrew the bottom of the pot without removing the pressure valve on the top...you'll hurt yourself trying to unscrew it. It won't loosen if there's still pressure in the bottom.
Chai Masala- Take 2
I couldn't help but tweak my first recipe because I think the cardamom was a bit too strong for my tastes. Here is my second recipe:
Chai Masala #2
Makes 28 servings
2 tsp ground cinnamon
1 tsp ground ginger
1/4 tsp ground cardamom
1/8 tsp ground clove
1/8 tsp ground black pepper
To make 2 servings:
Bring 2 cups of water, 2 tsp black tea (Assam is my choice), 2 tsp sugar, and 1/4 tsp chai masala to a boil. Let boil approximately 5 minutes until water is a deep amber and has reduced a little. Add 1 cup milk and bring to a boil. Remove from heat before it has a chance to boil over.
Now this is more like it! I love this recipe! A beautiful cup of chai for pennies a cup! Wonderful! I can't wait to share it with my friends. What I love about using the ground spices rather than fresh is that it's portable and I can mix up a batch and give it away in a little container, whereas if the spices were fresh, like the ginger, it would be more perishable and just a bit more work to prepare.
Chai Masala #2
Makes 28 servings
2 tsp ground cinnamon
1 tsp ground ginger
1/4 tsp ground cardamom
1/8 tsp ground clove
1/8 tsp ground black pepper
To make 2 servings:
Bring 2 cups of water, 2 tsp black tea (Assam is my choice), 2 tsp sugar, and 1/4 tsp chai masala to a boil. Let boil approximately 5 minutes until water is a deep amber and has reduced a little. Add 1 cup milk and bring to a boil. Remove from heat before it has a chance to boil over.
Now this is more like it! I love this recipe! A beautiful cup of chai for pennies a cup! Wonderful! I can't wait to share it with my friends. What I love about using the ground spices rather than fresh is that it's portable and I can mix up a batch and give it away in a little container, whereas if the spices were fresh, like the ginger, it would be more perishable and just a bit more work to prepare.
Monday, January 05, 2009
Masala Chai With Recipe
I've been on an Indian chai kick lately for unknown reasons. Perhaps it's because it is quite cold outside and the taste of the warm spices mixed with hot tea and milk is so comforting. Who cares that I'm lactose intolerant and by drinking all of this milk I could power four of my neighbors' homes for a week with my natural gas? Thank goodness the kids went back to school today and the hubby was at work! Poor dogs!
Tonight I've invited a friend over to share some chai with me. I can't wait for her input as her step-mother is from India and she is very familiar with this style of tea.
What's the difference between Chai Masala and Masala Chai? Glad you asked! "Chai" means tea and "masala" means spice so chai masala are the spices used to make the Indian spiced tea and masala chai is the finished spiced tea, according to my research. Please someone, correct me if I'm wrong!
Although I did have whole cardamom pods, I chose to go with the ground spices to make this easy.
Here is my first attempt at making my own Chai Masala (tea spice):
Makes 32 servings.
2 tsp ground cinnamon
1 tsp ground cardamom (I might reduce; just a bit heavy on the cardamom for me)
3/4 tsp ground ginger
1/8 tsp ground clove
1/8 tsp ground black pepper
To make 2 servings:
Bring 2 cups of water, 2 tsp black tea (Assam is my choice), 2 tsp sugar, and 1/4 tsp chai masala to a boil. Let boil approximately 5 minutes until water is a deep amber and has reduced a little. Add 1 cup milk and bring to a boil. Remove from heat before it has a chance to boil over.
Again, this is just a first attempt. I know everyone's tastes are different and I'll most likely adjust the measurements again. I just like that it's not the overly sweet, syrupy chai I've come to expect at the coffee places and that I can adjust the flavors to my taste. Oh, can I just tell you that I've got enough cardamom to last me a year or so? The green pods were just $1.99/ounce and I bought 2 ounces! I couldn't get over how cheap they were because I saw a little jar yesterday (about an ounce) for $11.00!

Tonight I've invited a friend over to share some chai with me. I can't wait for her input as her step-mother is from India and she is very familiar with this style of tea.
What's the difference between Chai Masala and Masala Chai? Glad you asked! "Chai" means tea and "masala" means spice so chai masala are the spices used to make the Indian spiced tea and masala chai is the finished spiced tea, according to my research. Please someone, correct me if I'm wrong!
Although I did have whole cardamom pods, I chose to go with the ground spices to make this easy.
Here is my first attempt at making my own Chai Masala (tea spice):
Makes 32 servings.
2 tsp ground cinnamon
1 tsp ground cardamom (I might reduce; just a bit heavy on the cardamom for me)
3/4 tsp ground ginger
1/8 tsp ground clove
1/8 tsp ground black pepper
To make 2 servings:
Bring 2 cups of water, 2 tsp black tea (Assam is my choice), 2 tsp sugar, and 1/4 tsp chai masala to a boil. Let boil approximately 5 minutes until water is a deep amber and has reduced a little. Add 1 cup milk and bring to a boil. Remove from heat before it has a chance to boil over.
Again, this is just a first attempt. I know everyone's tastes are different and I'll most likely adjust the measurements again. I just like that it's not the overly sweet, syrupy chai I've come to expect at the coffee places and that I can adjust the flavors to my taste. Oh, can I just tell you that I've got enough cardamom to last me a year or so? The green pods were just $1.99/ounce and I bought 2 ounces! I couldn't get over how cheap they were because I saw a little jar yesterday (about an ounce) for $11.00!

Homemade laundry detergent & dryer sheets

Saving money is always important, but I just had to try this out of sheer curiosity. The Duggars do it! I guess they'd have to with all the laundry they do. You can find many sites and a few videos on the subject if you just Google "homemade laundry detergent". I have been doing this for almost three months now and so far I've been quite pleased. I still use my liquid All on the rare occasion because my husband sometimes brings home his work clothes that are so stinky that my homemade detergent just can't cut it. I'm sure there's a homemade remedy for this as well...vinegar or baking soda perhaps?
Making liquid laundry detergent is a bit more labor intensive but the same recipe can yield so much more detergent and is, therefore, more cost effective than the powdered version. I just prefer powdered over liquid for this.
Here is the basic recipe that is repeated all over the 'net but I found it here:
Powdered Laundry Detergent
2 cups finely grated bar soap, i.e. Zote, Fels-Naptha
1 cup washing soda (NOT baking soda!)
1 cup borax
1. Mix well and store in an airtight plastic container.
2. Use 2 tablespoons per full load.
I tried grating a bar of soap for this and it felt like more trouble than it was worth since I did it in my small food processor, like I saw in one video, but it took longer to clean my processor than it did to grate the soap! I wasn't about to risk grating my knuckles doing it on a box grater as I saw on another video, so my lazy butt went to the store and bought the cheapest powdered laundry detergent, a 3 lb. box of Sun, which was about $3.00 US. Since I can't find washing soda (sodium carbonate) in my area I have been substituting it with Purex 2, which contains both sodium carbonate and sodium percarbonate, the latter of which is listed on the box as a bleach alternative. I bought a 1 lb. box for less than $3.00 US. You can find sodium carbonate in the swimming pool supply section of Wal-Mart in a product called PH Plus but at $7.00 US, it is not an option since the whole reason I'm doing this is to save money. Also, in my area, the Hispanic stores carry a bar laundry soap at less than $1.00 US. I think the box of Borax that I bought was also about $3.00. I found all of these at Wal-Mart.
Even though I'm not grating a bar of soap, I use basically the same ratios of:
2 parts powdered laundry detergent
1 part Purex 2
1 part Borax
I found a 3 tablespoon scoop in my junk drawer and I have been using that to measure my soap for each load.
After all this time, I have only just finished my first box of Sun, haven't finished a whole box of either Purex 2 or Borax! I haven't taken the time to do a real cost analysis of making my own detergent but it really seems to be working out cheaper thus far. Did I mention that I average 2 full loads of laundry a day, every day? I've already done 4 loads today and I'm not done yet...it's bed sheet day!
How do I soften my laundry? I was intrigued when I saw that people have found ways to make their own fabric softener sheets so I figured that since I'm on a roll, I'd try it as well. You can see a few alternatives at TipNut. I wasn't a fan of using either old towels or flannel because of the lint and/or fraying associated with them so I used some scraps of microfleece I had laying around, which doesn't fray once cut. I cut the fleece into roughly 4" x
6" pieces. One formula I found was to dilute 1 part of liquid fabric softener with 6 parts of water. I found this was too watery but dilution really depends upon which fabric softener you start with. Try 3:1 water to softener. Once you do it a few times, you get a feel for what the diluted softener should feel like to the touch to get your laundry as soft as you like. Mix the fabric softener and water in a lidded container and soak the strips. When you need to use them, take one or two and wring them out before tossing into the dryer. Dry as usual. There is no need to wash the strips when the load is dry. Simply put them back into the container to soak. Wanna know a side benefit of this fabric softener solution? Remember those fleece Swiffer-like duster cloths I made a while back? I have found that when I soak those in the softener solution, wring out and let air dry, they attract much more dust. You have to let them air dry after soaking as putting in the dryer defeats the purpose.
Thursday, January 01, 2009
Thursday, December 11, 2008
Easy Corn Chowder
This is what we had for dinner tonight. It's very filling and so easy to put together. A welcome meal after wrestling practice!
Easy Corn Chowder
1 lb. bacon ends & pieces (I use Farmer John Brand), sliced into 1/2 inch pieces
1/2 large round onion, diced
2 stalks celery, diced
2 cups southern style hash browns or diced cooked potato
1 can whole kernel corn, undrained
1 can creamed corn
1-12 oz can evaporated milk
2 cans Campbell's Cream of Potato Soup
1 can Campbell's Cream of Chicken Soup
3 soup cans full of whole milk
1/2 cup diced cooked carrot
pepper to taste
Saute bacon ends until most of the fat is rendered. Add onions and celery and saute until onion is translucent. Add the rest of the ingredients and simmer until potato is tender. Serve with fresh rolls or bread and a salad or sandwiches for a complete meal.
Easy Corn Chowder
1 lb. bacon ends & pieces (I use Farmer John Brand), sliced into 1/2 inch pieces
1/2 large round onion, diced
2 stalks celery, diced
2 cups southern style hash browns or diced cooked potato
1 can whole kernel corn, undrained
1 can creamed corn
1-12 oz can evaporated milk
2 cans Campbell's Cream of Potato Soup
1 can Campbell's Cream of Chicken Soup
3 soup cans full of whole milk
1/2 cup diced cooked carrot
pepper to taste
Saute bacon ends until most of the fat is rendered. Add onions and celery and saute until onion is translucent. Add the rest of the ingredients and simmer until potato is tender. Serve with fresh rolls or bread and a salad or sandwiches for a complete meal.
Monday, December 08, 2008
Christmas Cookie Exchange

Last night I baked some milk chocolate chip cookies with walnuts (recipe on Hershey's chips package) for Bernie to take to work. I'm auditioning recipes for a cookie exchange I'm participating in on Sunday. When my cousin, John, came to visit last month, he brought me some chocolate/caramel dipped shortbread cookies from a company called Big Island Candies. They were AWESOME! and I can't get them out of my head. (See picture above) I knew anything I baked myself wouldn't even come close, but I had to try. I took a basic shortbread recipe and dipped them in some melted milk chocolate. Yes, they were yummy but not the same. Unfortunately, my camera batteries are dead or I'd post a pic. Here is the recipe though:
Basic Shortbread Cookies
½ lb butter, softened
½ c sugar
2 ½ c sifted all purpose flour
Cream butter and sugar with fork until soft and well blended.
Add flour slowly.
Knead dough with hands until it comes together. Place on sheet lined with Reynolds parchment paper.
Pat dough down with hands into a rectangle shape until desired thickness, about ½ inch.
Cut into smaller rectangles but do not separate. Prick two times with a fork. Bake in preheated 350 degree oven for about 10 minutes or until cookies are starting to brown. Cool completely. Makes approximately 2 dozen cookies.
Dipping Chocolate
1 cup milk chocolate chips
1 tsp. vegetable shortening
Melt chips and shortening in a double boiler over medium low heat. When completely melted, turn heat down to its lowest setting to keep chocolate from setting. Either dip cookies into chocolate or spoon chocolate over ends of cookies. Place them back on the parchment paper and let chocolate set. I placed the whole sheet in the fridge to set before bagging into gift bags.
Sunday, November 09, 2008
My Cousin John's Pinakbet
My cousin, John, is in town for a visit. I've been looking forward to his visit since July. Why? Because that's the last time I ate pinakbet at my mom's house. Unlike John, I have no clue how to make a good pot of pinakbet, a Filipino (Ilocano) vegetable stew, which usually contains pork and shrimp. Everytime I've asked Mom to tell me how to make it, she can never give me any measurements and I've only once actually watched her make it. John, too, can't give me actual measurements as he cooks "by eye".
John and I went shopping today and had to go to three stores for all the ingredients. First stop was to a Mexican carniceria for the shrimp, pork belly, and some chicharron, which is pork belly with meat that has been deep fried until brown and crunchy. Yum! Next, we stopped at a Laotian market for some of the veggies: eggplant, bittermelon, shallots, and garlic. They didn't have great tomatoes or lima beans so we stopped at the supermarket for those.
1) Slice pork belly into little strips and brown in a pan with 2 cloves of garlic. Remove the garlic before it burns.


2) Peel and devein shrimp and prepare and veggies. Slice the eggplant into 2 inch long pieces. Soak in water so it doesn't oxidize. Slice bittermelon in half widthwise and then lengthwise. Scoop out seeds and white membrane. Soak in water. Core tomatoes, slice in half lengthwise and then remove seeds.


3) Using some of the rendered pork fat in a separate pan, saute eggplant until the edges become translucent.


4) With your hands, crush tomatoes into pot with browned pork. Let tomatoes deglaze the pot then simmer until the tomatoes start to lose their peels. Remove peels from the pot. At this point, the sauce has thickened and it's time to add about a cup of water to the pot. It's also time for the fish sauce, about 1/8 cup.


5) At this point, you will start layering the rest of the ingredients and CEASE stirring!!! Apparently, this is vital and not open to discussion. First come the lima beans (Fordhook are the best!), then the bittermelon, then the shrimp. After adding the shrimp, John sprinkles some Hon Dashi (fish granules), about 1 tsp., over the top. Lastly, add the layer of partially cooked eggplant. Partially cover the pot and simmer for about 15 minutes. Completely cover the pot and "toss" the contents without stirring. Enjoy your pinakbet over a bed of fresh, hot rice. You can either serve with sliced chicharron over the pinakbet in your bowl or add the sliced chicharron to the pot and simmer for a couple of minutes.


Thanks John!
John and I went shopping today and had to go to three stores for all the ingredients. First stop was to a Mexican carniceria for the shrimp, pork belly, and some chicharron, which is pork belly with meat that has been deep fried until brown and crunchy. Yum! Next, we stopped at a Laotian market for some of the veggies: eggplant, bittermelon, shallots, and garlic. They didn't have great tomatoes or lima beans so we stopped at the supermarket for those.
1) Slice pork belly into little strips and brown in a pan with 2 cloves of garlic. Remove the garlic before it burns.


2) Peel and devein shrimp and prepare and veggies. Slice the eggplant into 2 inch long pieces. Soak in water so it doesn't oxidize. Slice bittermelon in half widthwise and then lengthwise. Scoop out seeds and white membrane. Soak in water. Core tomatoes, slice in half lengthwise and then remove seeds.


3) Using some of the rendered pork fat in a separate pan, saute eggplant until the edges become translucent.


4) With your hands, crush tomatoes into pot with browned pork. Let tomatoes deglaze the pot then simmer until the tomatoes start to lose their peels. Remove peels from the pot. At this point, the sauce has thickened and it's time to add about a cup of water to the pot. It's also time for the fish sauce, about 1/8 cup.


5) At this point, you will start layering the rest of the ingredients and CEASE stirring!!! Apparently, this is vital and not open to discussion. First come the lima beans (Fordhook are the best!), then the bittermelon, then the shrimp. After adding the shrimp, John sprinkles some Hon Dashi (fish granules), about 1 tsp., over the top. Lastly, add the layer of partially cooked eggplant. Partially cover the pot and simmer for about 15 minutes. Completely cover the pot and "toss" the contents without stirring. Enjoy your pinakbet over a bed of fresh, hot rice. You can either serve with sliced chicharron over the pinakbet in your bowl or add the sliced chicharron to the pot and simmer for a couple of minutes.


Thanks John!
Subscribe to:
Posts (Atom)