Found this fan vid on YouTube, of course!
I first became aware of Richard Armitage from watching the final two episodes of the Vicar of Dibley, which was one of my favorite British comedies, starring Dawn French as the vicar. I then saw him in a BBC miniseries called North & South. He is one very handsome man! Apparently, I'm not the only one who thinks so. He looks like he coule be the UK's answer to Hugh Jackman. His fan base is kindof freakish in their demonstrations of admiration as evidenced by the following clip. Enjoy!:
Wednesday, May 27, 2009


Saturday, May 23, 2009
Thursday, May 21, 2009
Canned and good to go!

After doing my research on canning/preserving, I ran out to the store this morning and bought some 1/2 pint canning jars, which I think are a much more manageable size for my marmalade. I reheated the marmalade and sterilized my jars and rings, etc. I followed the instructions here. The coolest thing is hearing the little "popping" sound the lids make when they seal as they're cooling. I knew I was on the right track then. The only bad thing is that I think I lost some of that pretty pink color (it darkened a bit) when I reheated it. I'll do better next time for sure. I canned 5 jars and put the remainder in the fridge to enjoy now. All I have to do is figure out who I'll share these goodies with.
Wednesday, May 20, 2009
Pink Grapefruit Marmalade


A few weeks ago I was lucky enough to find a jar of Elsa's Story Pink Grapefruit Preserves at Home Goods. I think I paid under $6.00 for it. It was amazing! I was hooked and immediately wanted to make some for myself. Only problem was that I had never made preserves or marmalade before and didn't know how to proceed. I Googled for recipes and when I found this one on Recipezaar.com, it sounded too good to be true. Too easy! I figured I had nothing to lose but a couple of grapefruit and some sugar. I happened to be watching the final season of Ballykissangel on DVD and one of the episodes involved a jam making competition. That was the impetus I needed to get off my butt and make the marmalade. Since I altered the recipe and process a little, I'll post the recipe here so I don't forget what I did.
Pink Grapefruit Marmalade
3 red grapefruit
1 kilo white sugar
6 tbsps. Realemon lemon juice
Place grapefruit in pressure cooker and add enough water to cover fruit halfway. Cook on high pressure 40 minutes. Release pressure and remove fruit to a large bowl with a large spoon so as not to lose any pulp. Cut fruit with a fork and knife into small pieces. Add lemon juice. Pour cut fruit into a large pot and add sugar. Bring to a boil over medium heat and boil for 15 minutes, stirring frequently. If you have a thermometer, bring to jel stage or 220 degrees. I did not have a thermometer so I just had faith that it would turn out.
Since I made this marmalade on the spur of the moment, I didn't think enough ahead to get some canning jars so I made a quick dash to the store and bought some pint containers. I figured that whomever I gave the marmalade to would just have to consume it all within 3 weeks or risk food poisoning. I was assured by one friend that this wouldn't be a problem and after tasting it, I am sure it won't be!
Saturday, May 09, 2009

Glue stick basted hexagons


I thought I blogged about this already but I guess it must have been a dream. I've been making my hexagons like this lately for a couple of reasons. First of all, it's much faster than basting with needle and thread and secondly, my eyesight isn't what it used to be. I've realized that I need reading glasses to see what I'm doing, especially since I am making such small stitches and using needles with tiny eyes. Also, I don't see too well when I'm up at 2:00 a.m. trying to sew! I don't sleep well at all these days. In fact, I have to be completely exhausted in order to fall asleep and stay that way. I'm thinking it might be the dreaded "change of life". Anyway, back to the glue stick basting...in case you're concerned that it will be difficult to remove the papers once the hexagons are sewn together, don't be. They release just fine! I honestly haven't come across a reason not to do it this way, especially since the glue will come off in the wash and the glue sticks are readily available in any drug store and are very inexpensive! Try it, you'll like it.
Wednesday, April 22, 2009
My new computer

My husband thinks he's pretty slick. He went behind my back and bought me a new notebook to replace the one that died. It's pretty nice but as with any new computer, you have to get used to a different keyboard.
I'm having fun playing with it. I still haven't looked at the manual, so I don't yet know what I'm missing.
I'm still plugging away at my hexagon flowers. I am now up to 3 colors, purple, pink, and teal. They all have the same yellow centers so although they're different, they work together. I only have 22 flowers put together so far but I've been steadily making at least 2 per day. I'm also testing the washable glue stick method of basting. Much faster but I don't know how great it will be when it comes time to remove the papers. The glue really sticks!
I also made a little zippered wristlet upon which I've appliqued a teacup. I just wish I put in a layer of batting or interfacing to give it a little structure, but then again, I really didn't think it would turn out.


Tuesday, April 21, 2009
My first Tim Tam and a tuna casserole recipe

OMG! These biscuits are to die for! Steph and I stopped by the British Grocers store on Decatur/Twain this afternoon for a look-see as we had never been there before. We were used to getting our stuff at International Marketplace but were curious. They had all kinds of goodies but we found the prices of their products to be quite high. I understand that as a small store they can't buy as much as International Marketplace and keep their prices down. I did love their selection, however, and will be back. They carry frozen bangers, crumpets, scones, and other yummies as well as dry goods. Having heard about the delicious Tim Tam biscuits, I just had to get some. I also bought a couple of small bags of Smokey Bacon flavored crisps for Chris (whose favorite food in the world is bacon).
If you don't like tuna casserole, please look away now.

What do you do when you look at the clock and realize it's 7:30 pm and you haven't cooked dinner yet? I made tuna casserole!
1 16 oz pkg elbow macaroni
1 10 3/4 oz can condensed cream of chicken soup
1 10 3/4 oz can condensed cheddar cheese soup
1 soup can full of milk
2 6 oz cans tuna
2 cups shredded cheese (I used Fiesta blend)
salt & pepper to taste
Cook macaroni according to package directions, though I like to cook mine a little longer. Drain and set aside. Combine the rest of the ingredients except the cheese. Stir to blend completely. Add cooked macaroni and stir. Add cheese and stir to blend completely. Serve as is or transfer to a greased casserole dish, top with crushed Ritz crackers and melted butter and bake in a 350 degree oven for 15 minutes or until bubbly. I didn't have crackers on hand and we were to hungry to wait for that anyway. I served mine with homemade dinner rolls. A salad would have been good, too.
Saturday, April 18, 2009
Framed hexagons - quilt-as-you-go
Yesterday, my fabulous husband made me a couple of Lexan hexagon templates. Okay, I hounded him until he made them to shut me up.
I saw some projects that people made with this framed hexagon technique and just had to try it, particularly since it's quilt-as-you-go. I found the instructions and templates at OzQulits.com. Anyone who knows me knows that I don't have patience to wait for things and I especially didn't want to wait for a couple of templates to come all the way from Australia. Besides, for what purpose is my 3-car garage filled to the hilt with power tools of all sorts other than to make whatever I desire? Ha! (and that's not exactly what he'd say if I told my husband that!) Anyway, the templates for sale were 5" and 7" but I wanted them to be 6" and 8". "No problem", he says, and these are what he made for me. In fact, after seeing the completed hexies, he offered to make me a 10" template. See why I love him?
He made these templates from 1/8" Lexan (similar to plexiglas) so I can just position them over my fabric and rotary cut them. So quick! Also, because they're clear, I can fussy cut the fabrics if I want. I may offer a set on my Etsy shop to see if anyone else wants one.
I must tell you that like any sewing project, pressing is absolutely essential. I tried to do one without pressing and it was not pretty. Also, I found that for me, a small (1.8 L X 3.4 W) zigzag stitch was much easier for me to handle than a straight stitch. I really didn't have the desire to hand stitch these. I will, however, whipstitch them together by hand when I'm ready to connect them. I can get 8 of these hexies from one fat quarter for the front motif. I'm not sure how much of the backing fabric I've used. This is a fun little project and I can see these turning into a table runner. On their own, they make cute coasters.


I saw some projects that people made with this framed hexagon technique and just had to try it, particularly since it's quilt-as-you-go. I found the instructions and templates at OzQulits.com. Anyone who knows me knows that I don't have patience to wait for things and I especially didn't want to wait for a couple of templates to come all the way from Australia. Besides, for what purpose is my 3-car garage filled to the hilt with power tools of all sorts other than to make whatever I desire? Ha! (and that's not exactly what he'd say if I told my husband that!) Anyway, the templates for sale were 5" and 7" but I wanted them to be 6" and 8". "No problem", he says, and these are what he made for me. In fact, after seeing the completed hexies, he offered to make me a 10" template. See why I love him?
He made these templates from 1/8" Lexan (similar to plexiglas) so I can just position them over my fabric and rotary cut them. So quick! Also, because they're clear, I can fussy cut the fabrics if I want. I may offer a set on my Etsy shop to see if anyone else wants one.
I must tell you that like any sewing project, pressing is absolutely essential. I tried to do one without pressing and it was not pretty. Also, I found that for me, a small (1.8 L X 3.4 W) zigzag stitch was much easier for me to handle than a straight stitch. I really didn't have the desire to hand stitch these. I will, however, whipstitch them together by hand when I'm ready to connect them. I can get 8 of these hexies from one fat quarter for the front motif. I'm not sure how much of the backing fabric I've used. This is a fun little project and I can see these turning into a table runner. On their own, they make cute coasters.


Tuesday, April 14, 2009
Hexagon quilting - English paper piecing
The other night I saw some hexagon quilts and found them to be so pretty. I don't really want to undertake that kind of endeavor at the moment but still want to make something with these pretty little English paper pieced hexagons. I saw that some people turned them into coasters, purses, placemats, etc. I also wanted some handwork to take with me while hanging out with my friends at our weekly get together. These were perfect to work on! I adapted one of the little wallets I made into a mini sewing kit. It held everything I needed: templates, scissors, needles, pins, bobbins full of thread, and fabric strips. So neat and tidy and takes up as much room as my cell phone. Since the picture was taken, I have added a magnetic strip up the middle to hold my pins and needle while I'm sewing. I have lost one needle in Bernie's keyboard already and almost lost a needle a couple of times while sewing in my recliner. That wouldn't have ended well.
I appliqued one of the flowers to a hot pad but in a moment of "not-so-brightness" used monofilament thread! Yikes! I can still use it but have to turn it over and put the hot object on the back side so as not to melt the thread. Can you say, "Duh"!!?? I plan to make coasters as well as a table runner. These projects are very quick and so satisfying. I've seen the flowers appliqued to tote bags and jeans as well. Now I just have to figure out how I want to back them and I'll be good-to-go.
I also wanted to show the method I use to baste and piece these motifs. Some people pierce the paper when they baste. I do not. This way, I can reuse the same template several times. This example is the fourth motif I've made with the same set of templates. Thrifty or lazy? I found these templates online but I have since made my own using Microsoft Word. I tried printing on cardstock because I thought they'd last longer, however, I think I like regular printer paper instead for ease of removal. Keep watching to see where these little flowers end up!


I appliqued one of the flowers to a hot pad but in a moment of "not-so-brightness" used monofilament thread! Yikes! I can still use it but have to turn it over and put the hot object on the back side so as not to melt the thread. Can you say, "Duh"!!?? I plan to make coasters as well as a table runner. These projects are very quick and so satisfying. I've seen the flowers appliqued to tote bags and jeans as well. Now I just have to figure out how I want to back them and I'll be good-to-go.
I also wanted to show the method I use to baste and piece these motifs. Some people pierce the paper when they baste. I do not. This way, I can reuse the same template several times. This example is the fourth motif I've made with the same set of templates. Thrifty or lazy? I found these templates online but I have since made my own using Microsoft Word. I tried printing on cardstock because I thought they'd last longer, however, I think I like regular printer paper instead for ease of removal. Keep watching to see where these little flowers end up!


Sunday, April 12, 2009
Computerless!
I've been wanting to blog for awhile now but I am on my husband's desktop. My laptop is dead. I had a Gateway that was about 4.5 years old and was working just fine, especially since Bernie wiped the hard drive for me and we re-installed all my stuff. It ran so much faster without the extraneous crap on it. I went to turn it on a week and a half ago and the "on/off" button was stuck. We called the computer guy who came and fixed Bernie's laptop a couple of weeks earlier and he couldn't get the cover off while at my house so he took it home. Long story short: it would cost about 1/3 of what he thinks it's worth to fix it. No matter that we paid $1300 for it when we got it. He thinks I can find a comparable one for about $400. Maybe, but who wants comparable when I can get BETTER! In fact, I saw one the other day for about $600. Wow! I had no idea what is out there for the price! I'll be getting another laptop soon, when I can be assured the purchase won't leave us hurting, after the mortgage, bills, groceries, and other necessities are paid for. In the meantime, I can use Bernie's or Chris' computers.
What have I been working on? More potholders in that double-thick crochet pattern, some reverse applique coasters, padded paperback book covers, magnetic bookmarkers, and small bifold wallets. I even made myself a new tea wallet tonight. Sounds like a lot and it is, but I've been having fun. I love my book covers! I used to make them years ago, before I knew my way around a sewing machine. They were ugly but functional. I used to make them out of quilted placemats back then. The new ones are so pretty, especially with matching bookmarkers. The bookmarkers are quick and easy and I can dig into my scrap bag and find enough fabric for several. I've given a few as gifts already. I have really enjoyed the reverse applique coasters. I've been wanting to teach myself the different techniques for applique and this one was first. I found a tutorial on The Sometimes Crafter and they looked so easy I just had to try them. Mine turned out just too cute! I have already given away two sets. One set I liked in particular because I used Chris' old blue jeans as the main fabric and appliqued a hawaiian print to them. They were a gift to a friend who loves Hawaii. I'll make those again! Too bad I didn't get pictures of those! I think for my next foray into applique, I'll try this technique from A Few Scraps' blog. I don't use disposable fabric softener sheets anymore but I saved some of my used disposables for just this purpose. I hope to be able to post pictures soon.


What have I been working on? More potholders in that double-thick crochet pattern, some reverse applique coasters, padded paperback book covers, magnetic bookmarkers, and small bifold wallets. I even made myself a new tea wallet tonight. Sounds like a lot and it is, but I've been having fun. I love my book covers! I used to make them years ago, before I knew my way around a sewing machine. They were ugly but functional. I used to make them out of quilted placemats back then. The new ones are so pretty, especially with matching bookmarkers. The bookmarkers are quick and easy and I can dig into my scrap bag and find enough fabric for several. I've given a few as gifts already. I have really enjoyed the reverse applique coasters. I've been wanting to teach myself the different techniques for applique and this one was first. I found a tutorial on The Sometimes Crafter and they looked so easy I just had to try them. Mine turned out just too cute! I have already given away two sets. One set I liked in particular because I used Chris' old blue jeans as the main fabric and appliqued a hawaiian print to them. They were a gift to a friend who loves Hawaii. I'll make those again! Too bad I didn't get pictures of those! I think for my next foray into applique, I'll try this technique from A Few Scraps' blog. I don't use disposable fabric softener sheets anymore but I saved some of my used disposables for just this purpose. I hope to be able to post pictures soon.


Sunday, March 22, 2009

Double thick single crochet potholders
This past Monday, a very nice lady approached me when she noticed one of my crocheted flowers. I gave one to her and in exchange she showed me a stitch I had never come across in my 35+ years of crocheting! It is made by crocheting into the back loop of the current row and a loop of the previous row at the same time. This produces a single crocheted piece that is double in thickness compared to a regular single crochet. She then gave me 3 potholders that she crocheted this way. How nice! I was happy to share my treasures with Leah and Steph. Unfortunately, mine now sits next to my chair, partially dismembered because I forgot how the potholder was made by the time I got home. Thank God for the sample because now I can share it with you!
Mine is made with a size "H" crochet hook and two colors of Lily Sugar 'N Cream cotton.
Chain 26. Turn and single crochet in the 2nd ch from hook and in each ch across, which makes 25 single crochets. At the end of every row, ch 1 then turn.
From here to the end of the potholder, put hook into the back loop of the current row and the corresponding loop from the row below. Make sure you continue to have 25 sts every row. I found the last stitch to be the most difficult to make because the stitch from the previous row is a bit tight.
When the piece is of the desired length, you will put the hook in the the two loops as usual, however, you will make a slip stitch instead of a single crochet. This will finish off the top of the piece nicely. Create a hanging loop if desired by chaining 7 or 8 and attaching next to beginning chain. Chain 1, turn and single crochet into the loop. Fasten off and weave in ends.
I did some baking this weekend and this potholder was sufficiently thick to protect my hands from the heat.


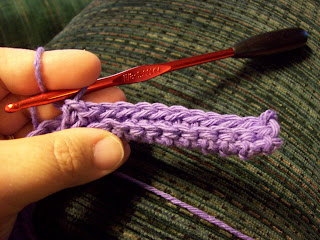


Mine is made with a size "H" crochet hook and two colors of Lily Sugar 'N Cream cotton.
Chain 26. Turn and single crochet in the 2nd ch from hook and in each ch across, which makes 25 single crochets. At the end of every row, ch 1 then turn.
From here to the end of the potholder, put hook into the back loop of the current row and the corresponding loop from the row below. Make sure you continue to have 25 sts every row. I found the last stitch to be the most difficult to make because the stitch from the previous row is a bit tight.
When the piece is of the desired length, you will put the hook in the the two loops as usual, however, you will make a slip stitch instead of a single crochet. This will finish off the top of the piece nicely. Create a hanging loop if desired by chaining 7 or 8 and attaching next to beginning chain. Chain 1, turn and single crochet into the loop. Fasten off and weave in ends.
I did some baking this weekend and this potholder was sufficiently thick to protect my hands from the heat.


Saturday, March 21, 2009
Sewing on Friday, yippee!


What do you do when you have two kids at home sick? Well, I spent a few hours sewing! The big kid had an upset tummy and the little one is getting over the flu. They were both parked in front of their TVs and didn't even notice I was in another room.
I've been wanting to make something out of these quilt squares I bought last summer when I was back home in Hawaii. The obvious thing would have been a quilt but I wasn't in the mood to devote that much time and I really have been wanting to make a runner for my coffee table anyway. I chose to make it very simple, using just three of the five prints available in my pack, backing it with microfleece and choosing to turn and topstitch rather than sew a binding on it. Also, as far as quilting it, I chose to machine tie it. I thought it might be neat to tie buttons on every intersection but it would have created an uneven surface upon which to rest a drink and I didn't want that.
After I finished with my table runner, I decided to make a little runner for the boys' bathroom to place their toiletries upon. Anthony vetoed it but as soon as he's not home I'll get my way!
Next, I wanted to treat myself to what was left of my Mary Englebreit fabric. I had made some pads for my Etsy shop out of it and always loved it because of the teacups and teapots, but hadn't made anything out of it for myself. I had just enough for two new pads and a matching zippered pouch. I love them! I swear, next time I see this fabric, I'm buying a few more yards of it and treat myself to a few more things.


Tuesday, March 17, 2009


Saturday, March 14, 2009
PG Tips Commercial with Monkey & Al
Love this commercial!
How about those outtakes?
Wallace & Gromit for PG Tips
How about those outtakes?
Wallace & Gromit for PG Tips
Keeping my tea warm and a new round ripple


I was reading Steph's Cup of Tea today and in a previous post she asked if people drink tea at work and how they do it. That post reminded me of Betty, a very lovely, older British lady I used to work with. She made tea in her favorite rose covered cup several times a day and stashed her biscuits in her desk. As far as I can remember, she was our lone tea drinker. I was a coffee drinker in those days but I still loved watching her drink her tea. Betty resembled Maxine (from Hallmark cards) in both appearance and demeaner, but I liked her and she liked me. It was an honor as she didn't like a lot of people.
This got me thinking about how I used to keep my large mug of coffee warm at my desk and that I tried keeping a pot of tea warm like this awhile ago. However, I forgot the most important thing about keeping a pot of tea warm...preheating the pot! Very important! So, today I got out my two little warmers (one is for candles and the other for keeping food warm) and redid my experiment. After over an hour, both the pot and lidded cup's contents are at a nice drinkable temperature, not too hot. I didn't want to waste the water from my tea kettle for preheating the pot, so I filled it with tap water and heated it in the microwave for 3 minutes with a chopstick in it to prevent superheating. Superheated water is a pheonomenon where water is past boiling temperature but hasn't actually come to a rolling boil. This is extremely dangerous as it can cause 3rd degree burns to whichever body part happens to touch the water. Watch it here and here.
I just posted a picture of my new ripple over at the No End In Sight Ripple Along site. Geez, I haven't been there for a long while. I'm making it for my friend, Leah. It won't be a secret from her for long as I will be working on it in front of her on Monday. If you haven't already guessed, she's the same Pittsburgh Steelers fan I made the flowered hat and scarf for a little while ago. I hope she likes it.

Subscribe to:
Posts (Atom)