Sunday, December 23, 2012

Knitted headband/earwarmer


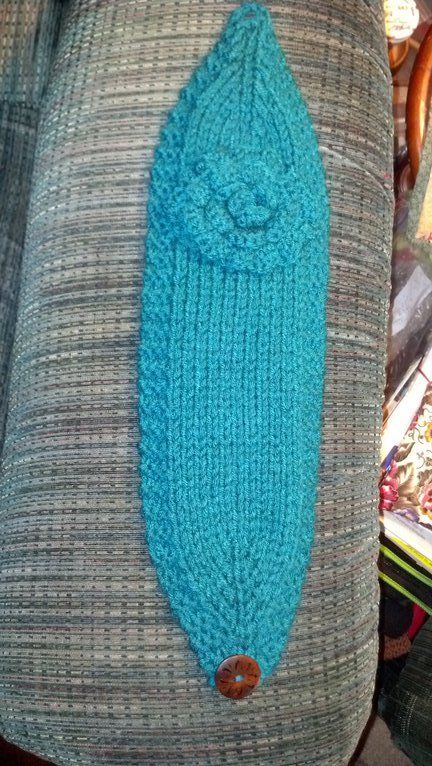
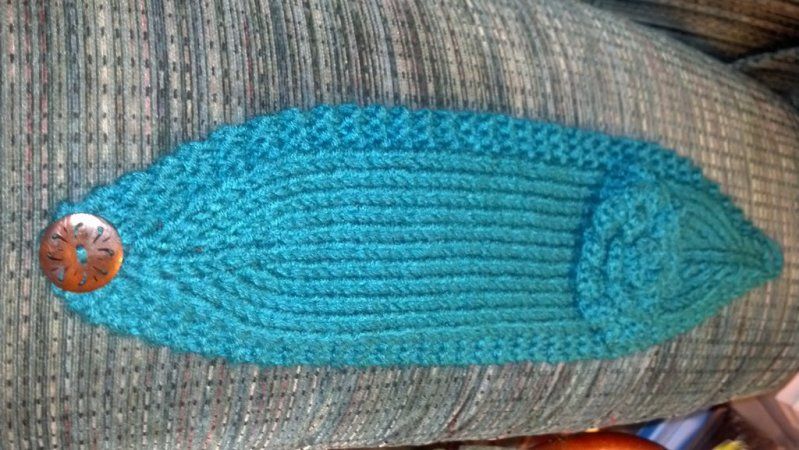
Sorry for the cell phone photos but these are all I had of this headband/earwarmer. 
I am not a good pattern writer but this seems straightforward to me.

Knitted Headband/Earwarmer

Worsted weight yarn held double throughout
Size 11 US knitting needles
1 button 30mm

M1 by YO

CO 5 sts and knit across.  You will be increasing in the stitches before and after the center st so you may want to mark it.

Row 1: K2, YO, K1, YO, K2 = 7sts
Row 2: K2, purl YO through back loop (PYOBL) throughout so as to leave no holes, P1, PYOBL, K2
Row 3: K3 (from now on K3 selvedge sts on each side on every row), YO, K1, YO, K3 = 9sts
Row 4: K3, PYOBL, P1, PYOBL, K3
Row 5: K3, K1, YO, K1, YO, K1, K3 = 11 sts
Row 6: K3, P1, PYOBL, P1, PYOBL, P1, K3
Row 7: K3, K2, YO, K1, YO, K2, K3  = 13 sts
Row 8: K3, P2, PYOBL, P1, PYOBL, P2, K3
Row 9: K3, K3, YO, K1, YO, K3, K3 = 15sts
Row 10: K3, P3, PYOBL, P1, PYOBL, P3, K3
Row 11: K across
Row 12: K3, purl across to last 3 sts, K3

continue rows 11 & 12 until there are 31 garter row bumps (along selvedge edges) ending with a row 12.

Decrease rows:
Knit side: Work opposite of increase rows by K2tog before and after center st. 
Purl side: K3, purl across to last 3 sts, K3
Decrease  until 5 sts remain then BO leaving 12" tail

Use tail to crochet 3 chains and attach to opposite side.  Weave in ends.  Sew on button and accessorize with a crocheted flower of your choice.

Thursday, October 25, 2012

Crocheted dog harness

I had to take my Samantha to the vet the other day for an eye infection.  Our vet is in PetSmart so after we were done, Chris and I took her for a stroll around the store and I started looking at dog harnesses.  I have wanted one for her for awhile but don't want to pay $25+ for one.  I actually wanted to sew one for her but came across pictures of a crocheted one upon doing a Google search.
I actually didn't follow the pattern but used the pictures as a jumping off point.  My notes as follows:

Size I crochet hook.  Red Heart worsted weight acrylic yarn, doubled.  This gives you a nice firm harness.

Using 2 strands of yarn held as one, chain 43.  Work sc in next 42 sts.  Work 3 rows in sc.  Chain 36 and join to other end of strip.  Work 3 rows in sc.  Work 5 sts along short edge and work sc dec in next three rows until you have 3 sts left.  End and leave a long tail.  Do the same to other short end.  Sew on a side release buckle to each end.  This is to keep the harness attached to your dog.  Then I tatted a loop on each side to attach the leash clasp to.  If I had some metal D rings I would have used those instead but these are nice and work very well. 
Don't let Sam fool you.  She likes it.  She just doesn't like having her picture taken.  I think she needs another one in pink.


Wednesday, October 17, 2012

New scarf pendant

Just got this pendant from my friend, Pat.  So excited!!


Tuesday, October 09, 2012

Argo Tea Bottle Cozy

I didn't waste any time making this cozy for my tea bottle.  After brewing some green tea in my bottle, I realized it was too hot to handle.  I crocheted this cozy using a size I hook and some Lion Brand cotton yarn.  Round 1: ch4 then dc 11 in 4th ch from hook.  Sl st in top of 3rd ch of beginning st to join.  Ch 3 & turn.  Round 2:  Make dc in same st as ch 3 then 2dc in each st around.  Join w/sl st.  Ch 3 & turn.  Round 3: 1 dc in back loop of each st around.  Join w/sl st.  Ch 3 & turn.  Rounds 4 - 10:  1 dc in each st around through both loops.  Join w/sl st.  Ch 3 & turn, except for round 10 where you'd end w/sl st.  End off & weave in ends.


Argo Tea

Whilst shopping at my local Albertson's tonight, I spotted this tea.  I was originally drawn to the heavy glass bottle but the flavor, mojitea, is what made me buy it.  It is a combination of lime, mint tea, and pure cane sugar.  This turned out to be some of the worst tasting tea I've ever had!  I couldn't even finish the scant 13.5 ounces.  Hopefully, my $2.99 will not be entirely wasted and I can reuse the bottle as sort of a travel tea tumbler for green tea.  I'll bet if I put the tea leaves into one of my reusable drawstring tea bags it will work.  Cross fingers! 


Friday, September 07, 2012

Salads in Jars


Salads in jars!  Why is everyone doing it?  Because they're freaking awesome, that's why!  My first attempts are pretty boring but still great.  I made these on Wednesday and ate one the following day. The lettuce was so crispy, as were the mushrooms and golden cherry tomatoes.  I added ham, cheese, and Greek Feta dressing.  Yum!  They're supposed to last at least a week.  I made 3 all together and the other two still look great as do the strawberries I jarred on Monday.  Oh, I vacuum seal them as well.  I have a FoodSaver machine ($$) but I also bought a little hand-held model for $20 at WalMart that works very well.  If you want to keep the jar lids intact, you'll need to get a wide mouth jar vacuum attachment.  If not, you can puncture a hole in the lid with a thumb tack, lightly cover with a square of electrical tape, then place the hand-held vacuum sealer over the tape and seal.  Listen for the change in sound and you might even hear a slight "pop" as the lid is sealed.

Crocheted "frisbee-like" disc

My friend, Pat, called me today and asked if I was interested in making a crocheted "frisbee-like" thing for her husband's co-worker.  I had never heard of them but a Google search of "crocheted frisbee"  gave me a good idea of what he was looking for.  Since I'm sick today and watching my British dramas, something to crochet was a good distraction.

I came up with this: 
 
It flies straight and for quite a long distance.  I was throwing it in the house so I don't know exactly how far it could have gone. 

Crochet hook size I
Worsted weight cotton yarn held double throughout.  Make color changes as desired.

Rd 1: Using magic loop method, make 6 sc in loop.  Join with sl st in 1st sc, ch 1 and pull closed.
Rd 2: Work 2 sc in each sc around.  Join with sl st in 1st sc, ch 1.
Rd 3: *Work 2 sc in next st then 1 sc* around.  Join with sl st in 1st sc, ch 1.
Rd 4: *Work 2 sc in next st then 1 sc, 1 sc* around.  Join with sl st in 1st sc, ch 1.
Rds 5-9: *Work 2 sc in next st then 1sc, 1sc, 1sc* around.  Join with sl st in 1st sc, ch 1.
Rds 10-11: *Work 2sc tog in next st then 1sc, 1sc, 1sc* around.  Join with sl st in 1st sc, ch 1.
The decreases in these last two rounds create the lip of the disc.  Fasten off and sew in ends.  Done!  Go fly a disc!  Beware, you can't make just one!

Thursday, August 30, 2012

Bento bag lunch kit

Like my friends, you may be wondering why I need a bento bag when I don't work and, therefore, don't have to pack a lunch.  I just wanted one...that's why.  They're cool!  I pack my husband his meals for work, but because he works 24 hour shifts, a bento box just isn't practical.  I usually have to pack his meals in a shopping bag!  So, my son asked what I'm going to do with my bento bag.  "I'll pack a lunch and have a little personal picnic", I said.  I can see it now.  When the temps aren't in the 100's, I can go to the park with a good book and my bento lunch. 

I have a container that measures 8.5"L x 5.5"W x 3" H.  I figured that I wanted it a bit more than 2x taller than my container.  My pattern pieces measured 15" W x 12" H with 3" notches cut out at each corner.  You can get instructions on how to customize your bags here.  Besides making my fully lined bag, I also made a matching napkin and a sleeve for my chopsticks which ties shut at the top.  I love it.  The colors are so bright! 


The pink and blue set were my first attempts.  I don't know what I was thinking when I cut the fabric.  I only had enough for one side of each color!  Doh!  So it's unlined and half is pink print and half is blue.  It also was meant to be like the black one, taller and with a drawstring, but I didn't realize how short it was until after I cut out the corners for the boxed corner and knew I had to add height, which wound up being 4x the height measurement of my container.  I altered it to mimic another bento bag I saw online with the ties.  It's still cute, just not what I wanted.  It's all good, though.  Now I have two kits!

My friend, Steph, and I are going to a couple of Asian markets tomorrow and I'm going to keep my eyes open for more bento accessories. 

When I was a kid, going on a field trip for school meant taking a bento lunch.  They weren't the cute things you see on the blogs.  They consisted of a bed of rice sprinkled with furikake (toasted seaweed with sesame seeds), maybe ume (pickled plum), teriyaki beef, a piece of fried chicken, and a piece of Spam.  It was perfect because it didn't need to be refrigerated and would keep until lunchtime.  Add to that a can of fruit punch or passion-guava juice that I froze the night before and it was great!  Almost better than the field trip itself!  I felt so sorry for the kids who brought sandwiches!  My field trip days are over now that my youngest son is in middle school.  Boy, I wish I had thought of this earlier!  Maybe I can persuade him to take a bento for lunch?

Friday, August 10, 2012

Grow green onions in water

I saw this idea in Pinterest.  There are several fruits/veggies you can grow this way by putting a slice, pit, root end, etc in water rather than throw them away.  I think we all did this with potatoes, avocados, or beans when we were kids, right?  I bought these green onions at a local farmer's market three weeks ago and have already cut them down three times!   


Saturday, August 04, 2012

Tote bag and zippered pouches

The first pouch is a gift for my sister, Gina, for her birthday.  I enclosed a pair of silver earrings and gave them to her while she was visiting last weekend.  She requested a matching velcro closure cash envelope/wallet, which went into the mail to her on Thursday.  I got the idea for all three pouches from this video on YouTube:


I was gifted this denim fabric (below) from my neighbor and wasn't sure what to do with it until the other day when my friend, Pat, came over for a playdate.  I love our playdates!  We usually have so much fun visiting that we don't get very much done.  I showed her how to make the velcro closure cash envelope/wallet (not shown) and we made one of these pouches.  I made her a tote bag to take home and made mine and the two matching pouches after she went home.  I just wanted to show her how much I can do on my serger and how much I'm enjoying it so far.  I've had it for 3 years and only used it once right after I got it.  My poor husband kept asking why I wasn't using it.  It scared me!  So, knowing this, when Pat bought a new embroidery machine and started taking classes on it, she asked her sewing teacher to show me how to use my serger.  One class and I've been hooked since!  I have my second class in two days.  She's going to show me how to do a narrow rolled hem.   I'm so excited!  I see a lot of cloth napkins and scarves in my future!

Anyway, the pouches are lined, unlike the ones in the video and all raw edges are serged.  I prefer to sew the zippers on by machine rather than serger because I don't like the idea of my serger knife cutting the zippers since I've been making a bunch of these pouches. 


Car trash bag

I've been trying to rework this concept over and over in my head.  This is just a prototype and as we speak I have ideas to make it better.  It fits a one gallon zip lock bag, which when turned inside out, creates a stiff rim at the top.  What I really wanted was for the hem that turns inside the bag to be longer and have some stabilizer attached so that when a zip lock bag is inserted inside the holder, the hem will keep it in place.  As it happened, the hem is too short and I didn't have any stiff Pellon stabilizer when I sewed this.  I even considered using boning around the rim but it doesn't seem to need it.   The inside out zip lock provided enough stability to keep the bag open but I actually machine basted the bag inside the holder.  I can remove the plastic bag with just a few snips if needed.  It's not what I wanted, but for now it will do the job.  It is tied to the underside of the lid of the center console of my truck to keep it in place.  Oh well, back to the drawing board.

Sunday, July 01, 2012

Crochet Baby Barefoot Sandals

My neighbor came over tonight and asked if I could make some of these as her son and daughter in law are expecting a baby soon.  I saw some really cute ones on Etsy but decided to just wing it.  I sure hope they will fit.  It's been awhile since I've been around a little baby.

The following are just my notes & not a pattern:
Using sz 3 crochet thread & sz D (3.25 mm) hook, Ch 8.  Join.
Ch 3, 2dc in loop, turn
Ch3,  dc in same st. Dc in next st.  2dc in top of ch3 from previous row.  Turn.
Continue inc in this manner until last row is made of 9 dc.  Ch 36 and cut thread.  Join @ top of other side & ch 36.  Cut thread.  Weave in ends.  Make 2 flowers and attach to top of feet.
Flowers:  ch 8 and sl st in 1st ch.  Ch 8 and sl st in same ch.  Repeat until you have 8 loops.  Cut thread and pull end through center of flower.  Pull tail until center closes almost closed.  Make another flower this way but only ch 6 instead of 8.  Pull tail tightly closed, stack atop larger flower and feed tails through larger flower then pull larger center tightly shut.  Attach to top of sandal.  Repeat for other sandal.


Saturday, June 16, 2012

New phone

Just got a new Motorola Droid 4 today.  Just playing around on it.  Things I hate about getting a new phone are that I have to reinstall my apps and ringtones.  I passed my phone down to my eldest son because he broke his and isn't due for an upgrade for awhile.  At least I can see what apps I had before he totally wipes my old phone clean!

Friday, June 01, 2012

How to make a cafe latte with your existing Keurig without buying the new Vue!

We love our Keurig and I know many people love theirs, too.  I, however, do not love my Keurig enough to spend $250 on the new Keurig Vue coffee maker.  Yeah, I watched the infomercial last night and when I saw that the new Keurig can make lattes, it got me thinking.  I'm going to show you how to make a latte in your existing Keurig and save $250!  This one will be better because you use real milk, not nonfat dry milk and powdered cream that are in the Vue's latte frother pack.  The Vue takes two steps to make a latte and costs $1.50 each.  My way takes three steps, costs just pennies (since I refill my K Cups), but is very easy to make, you'll see.

Step 1: Pour about an inch of milk in the bottom of your coffee cup and microwave for 40 seconds.

Step 2: Froth the milk.  I bought my frother on eBay for less than $2.00.  Mr. Coffee also makes a frother that you can buy at WalMart for about $8.00.

Check out this froth!  Amazing!

Step 3: Brew your coffee


There you have it!  A REAL latte made using your Keurig!  Sweeten, stir, and enjoy!

Monday, March 26, 2012

A new DIY Kick Spindle (Mother Marion's Spindle) for me!

It's official...I'm now a spinner and happy yarn-maker. (The yarn pictured above is a 2-ply I spun and plied on a Turkish style spindle my husband made)  I just woke up one day and wanted to learn to spin.  I watched practically every video on YouTube and requested many books from my local library on the subject of handspinning and spindling as I knew a spinning wheel was out of the question.  I received the bottom whorl drop spindle and fiber I ordered from Etsy.com then visited my LYS to sign up for a spindling class.  By the time I showed up for my first class I pretty much knew what I was doing but had fun anyway.  I showed my husband several more drop spindles and expressed my interest in a kick spindle, practically begged him to make them for me, especially the kick spindle.  Well, he did it!  I've been happily spinning on my kick spindle since 4 am Sunday morning and love, love, love it!  I expected my leg to get tired of using the kick spindle but it doesn't.  I think it has to do with the height of the chair I'm using.  I tried it while sitting in my recliner and, sure enough, my quadriceps screamed at me to stop after just a couple of minutes.  I now use my husband's computer chair at it's highest height setting and it's perfect.  My leg naturally swings at the right height to kick the wheel, almost effortlessly.  My favorite thing about the kick spindle is the ease at which I can wind on the spun singles then back around the cup hook to begin spinning again.  I can't wait to ply on the kick spindle.  I have an idea it will be a dream!
I think he'd be upset if he knew I was blogging this picture.  He is not happy with the way it looks as I was urging him to just "slap it together" so I could use it already!  But now that he knows how it works and the proper angles, he wants to make me another one, but prettier.  Okay, I can live with that!  LOL  First of all, the base need not be so long but it is nice and sturdy without any wobbling or moving at all.  That was my only complaint about the kick spindles I've seen for sale.  The bases look too clunky and unstable.  He also wants to find another ball bearing to go into the upright support so that it might spin longer and faster.  He wants to make it more decorative by carving designs into the kick wheel and perhaps make it more portable.  Right now you can remove the spindle, whorl and kick wheel but the upright support is fixed.  It was a learning experience for him and I am the happy recipient of his experiment.

Thursday, February 23, 2012

Learning to spin and new spindles

I don't know what's gotten into me lately but I can't get the idea of spinning wool, or more specifically, spindling (using a spindle rather than a wheel).  I ordered a drop spindle and some wool roving from Etsy and couldn't wait to get it before asking my husband, an avid woodworker, to make me a supported spindle like the Russian and French spindles we saw on YouTube.  I made him watch videos with me and then look on websites for examples of these types of spindles.  This afternoon he went to his workshop and fired up the lathe and made these three spindles for me.  Each is a little different, all are very lightweight, and each beautiful because he made them just for me!  I raided his workshop for the two bowls, which he made years ago and was storing tools in.  Yes, that green mess is my first attempt at spinning singles.  Right now, I'm actually knitting up a swatch of this yarn, which is way too overspun and kinked up like crazy until I figured out how to let it unspin some. 

I have lunch planned for tomorrow with some friends in the vicinity of a local fiber shop that sells roving and gives spinning lessons.  I can't wait to check it all out!  Hopefully my drop spindle and more roving will arrive next week so I have more to practice on.  I have also joined multiple spinning groups on Ravelry so I can drool over everyone else's spindles, yarn, etc.

Hon, I love you very much!  Thank you for the wonderful new tools (notice I didn't say toys?)!

Tuesday, January 10, 2012

Nook Tablet Cover, not a pattern, just my measurement notes


I wanted to make myself another cover for my Nook Tablet, just like I saw on Etsy.com.  I didn't want to buy one, nor did I want to pay for a pattern.  The challenge is in figuring it out by myself!  Here are the measurements of the fabric pieces I need to make the covers.  Not a pattern, just my notes so I can make more. 
Nook Tablet Cover

Inside:
2 pcs - 6.5" x 9.5"
4 pcs - 3.5" square, pressed in half diagonally for corners
1 pc - 11" x 9.5", pressed in half with 9.5" ends together for pocket
1 pc - 2" x 9.5" for closure loop

Outside
1 pc - 12.5" x 9.5"
If using a pieced front cover, make 2 pieced pieces 6.5" x 9.5" and sew along the 9.5" side
Batting of choice 14" x 11.5".  I use fusible fleece.

Optional
1 pc - 11" x 9.5" for chipboard sleeve
1 pc chipboard slightly smaller than 11" x 9.5"

Thursday, January 05, 2012

Knitting & reading

I've never read Charlaine Harris until now.  I thought all her books were about vampires.  Dopey me.  Her Aurora Teagarden mysteries are of the cozy genre and revolve around a part-time librarian, mystery buff.  I read her third book first on my new Nook, borrowed free from my local library via .pdf download.  I couldn't get any others this way but found the 2nd, 4th, & 5th in paperback @ my library.  I'm enjoying them so far.  I love being able to download free books from our library system!  This is why I wanted a Nook or Kindle in the first place.  I've had both the Nook & Kindle apps on my phone & computer for awhile now and like that I can read on them but my eyesight isn't so good anymore and the small print on my phone was killing me.