Friday, September 13, 2013

Poor girl's Chemex

I can't remember where I saw the link to the Pour Mason, which is a pour-over coffee system based upon the Chemex coffee maker.  At the time that I found this link, I was testing some prototypes of cloth Chemex filters at the request of someone on Etsy.  Chemex filters are something I do not currently carry in my Etsy shop because I've never actually seen or used a Chemex and didn't know anything about them other than the way they look.  Anyway, I was playing around with a few different styles of cloth filters and remembered the Pour Mason.  I keep mason jars around the house all the time.  My husband and son love to drink out of them daily and I use them for salads-in-jars.  The first filters I tried worked in the funnel because the opening is small.  When I tried them in my wide mouth canning funnel, to replicate an actual Chemex, they slid right through the hole if I was only brewing a single cup, but stayed put if I was brewing 3-4 cups.  I only have plastic funnels and was afraid of a plastic taste to the coffee.  I gave the brew to my husband, who didn't complain about such a taste.  I probably won't be doing this again since I have a Melitta pour over, and my own full immersion filter system, which already work with mason jars, but it was fun to try.

Monday, August 19, 2013

Stethoscope Cover


stethoscope cover
Originally uploaded by mrhodes702.

I made this stethoscope cover for my sister, Gina. I have been making her (and her co-workers) all different types of covers over the years, mainly knitted ones. I wanted to do this one because I'm just getting used to my embroidery machine and thought it might be nice to personalize her cover. I saw a cover on Etsy that uses minky on one side and I happen to have a small piece left over from a baby blanket. I will still put her name on it. She can't wait to get them! Before I forget, Here are my notes:

2 pcs - 4 1/2" x 25" for body
2 pcs - 4 1/2" x 3" for interfacing (same fabric as body)
1 pc - 4 1/2" x 4" for tab
1 pc - 3" length of 1/4" elastic
1 snap set

I serged most of the cover except for making the tab, sewing the casing for the elastic, and the top stitching around the top of the cover. 

First off, I embroidered her name on one body piece.  Then I made the tab by folding each 4" side towards the middle, pressed, unfolded, folded 1/2" up from one 4 1/2" side then both pressed sides toward the middle.  Sew along 2 long sides and one short side.  Sandwich the tab between the front piece and one interfacing piece, right sides facing, along a short side and sew.  Sew the 2nd interfacting piece to the 2nd body piece, right sides facing, along a short side.  Now this part might be confusing:  Lift up the interfacing pieces so you have two long flat pieces and, with right sides facing, seam along one long side.  Now make the casing for the elastic by folding up 1/2" on the other short side and press.  Sew with a 3/8" seam allowance.  Thread elastic into casing using a safety pin.  As soon as the non pinned end enters the casing, tack it down so it doesn't get sucked into the casing.  As soon as the pinned end exits the casing, tack it down so it doesn't get sucked back into the casing.  Sew the remaining long edge, turn right side out and tuck the interfacing down into the body and top stitch 1/8" from the edge.  Add one side of the snap set to the end of the tab, centering it.  Add the other side of the snap, so that it corresponds to the tab, on the body.  Finis!

I'm still playing around with the construction. I don't know if the tab is absolutely necessary. I may just forgo the tab on the next one and just add the snap set to the top of the cover. We shall see!

Friday, August 16, 2013

Knitted & crocheted donut bun maker


Knitted & crocheted bun makers
Originally uploaded by mrhodes702.

Worsted weight yarn. Donuts shown were made in Red Heart yarn. Use a color that best matches your hair.

Size US8 needles. CO 28 sts. Join and knit in the round for 10". Bind off, roll down with stockinette side showing, sew bound off edge to body matching stitch for stitch all the way around.

To make a larger diameter, just cast on more stitches. To make a fatter donut, work more rows.

The bun maker on the right was crocheted. I used an H size hook and chained 28 sts. Slip stitch to join in a circle, being careful not to twist the chain. Ch 2 and work a dc in each remaining chain. End each round by slip stitching into the top chain of the starting ch2. Work 20-30 rounds in DC.  Occasionally, you can roll the tube down to see if you want all 30 rows.  Stop whenever you like the size of it.  End off and roll into a donut shape. Sew top edge of last row to body of donut matching stitch for stitch all the way around.

I use the screw type hair pin to secure the bun to my head.  I typically use three.  They're made by Goody and sold in practically any drug store.  One of the biggest benefits of using these knitted or crocheted bun makers over a sock bun is that they have natural holes into which you can insert hair pins and I feel it's much more secure this way.

To learn how to style your hair using a bun maker or bun donut, go to www.YouTube.com and search "sock bun" or "bun donut".  There are several videos to choose from.  

Thursday, July 11, 2013

Beginning sock knitting

I knitted my first pair of socks in 1999.  I found I disliked double pointed needles (love them now) and moved on to do the Magic Loop method then the 2 circular method (a la Cat Bordhi).  I prefer Magic Loop for socks rather than 2 circs for many reasons, but primarily because it's cheaper than having 2 circs in several sizes available at the same time and not hung up in another project. 
Someone on a FB knitting page was having a hard time learning to make socks and I was reminded of the site that helped me tremendously in those early days.  I had to go to the Wayback Machine  to find it.  Here is the link.  Full of helpful pictures all along the way.  I don't make socks like this anymore as I prefer toe up, but it's a great way to learn the anatomy of a sock.

Sunday, July 07, 2013

Quick card

Made this quick card for a friend who is going through a hard time.  I hope this lifts her spirits!

Saturday, July 06, 2013

No worry beef curry!

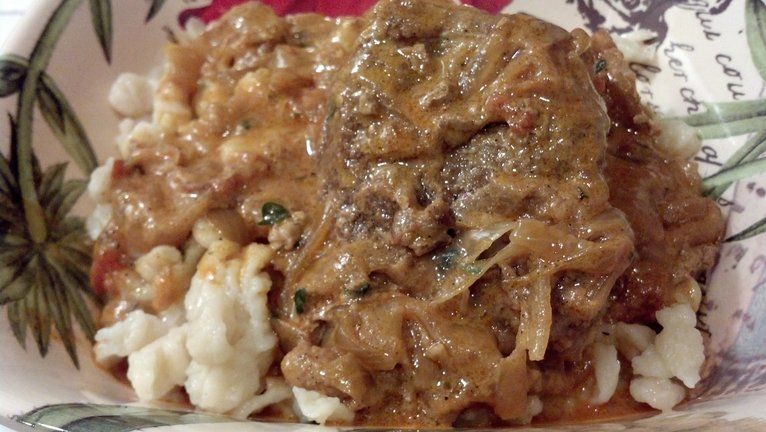
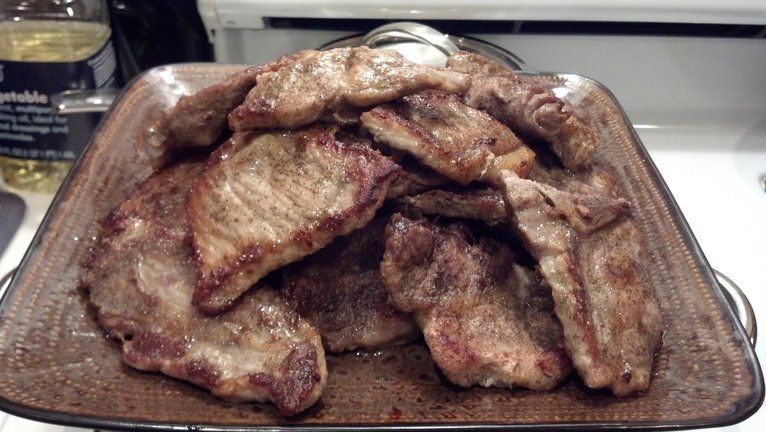
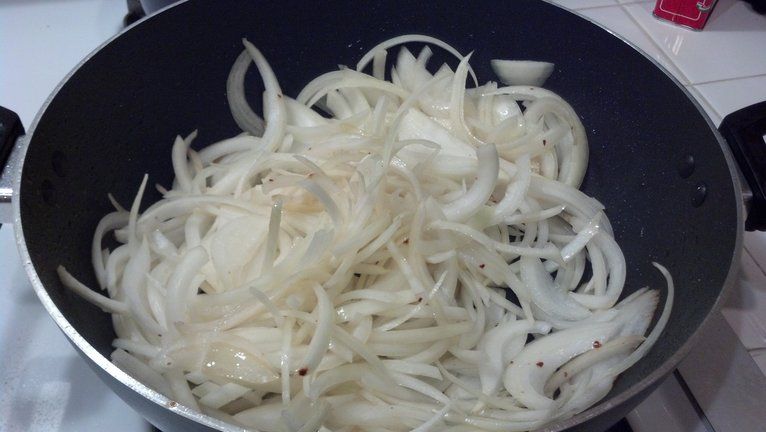
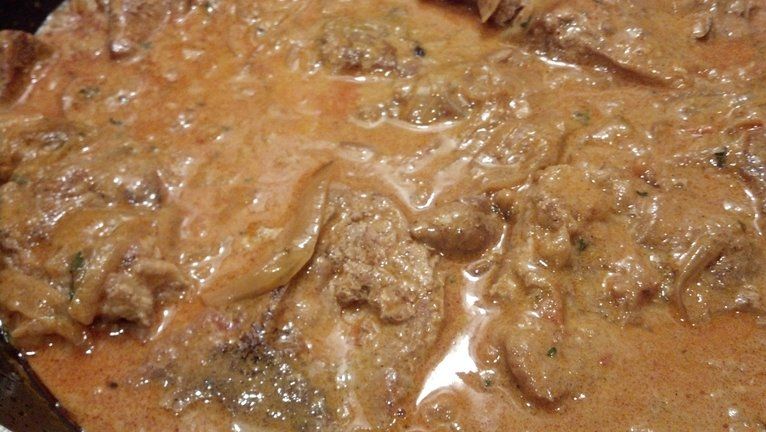
That's just something we say in Hawaii, kind of like "don't sweat the small stuff".  Tonight's dinner is beef curry made with a chuck roast, Japanese S&B curry in  medium hot, & typical curry veg: onions, carrots, potatoes & celery.  Missing was the bell pepper.  I've been craving this for days!  Time to get my grind on!

Great! I'm not just getting "old"...I have fibromyalgia!

I'm 48 years old.  It doesn't bother me to say it or to be it.  It is what it is.  My kids love telling me that I'm OLD.  If I didn't color my hair, I'd be completely grey, like my daddy, who was not only grey, but white in his early 40's.  No one knows when my mom would have been completely grey or what her exact natural hair color was, as she has been Loreal's Dark Auburn for as long as I remember.  God, please make Loreal discontinue Dark Auburn.  It is a rather unnatural color and doesn't appear anywhere in nature other than in a sunset, but I digress.

All of those aches and pains I've been suffering on and off for a couple of years made me truly believe what my kids were saying.  Getting old sucks!  I just tried to accept it and deal with it.  Finally, last week I decided to go see my GP just for shits and giggles.  I actually told him when he walked into the examining room that I didn't know why I was there and that he probably couldn't help me.  He asked me questions, gently poked and prodded, and said, "You have fibromyalgia".  I almost burst out laughing because all I knew about fibromyalgia is that you hurt all over.  My husband and I have been joking for a couple of months because after watching me walk painfully after getting out of my chair I exclaimed one night that I must have fibromyalgia, haha.  I was somehow relieved that there is a reason for my pain and it's not just me getting old.  He put me on a combination of vitamins and minerals plus something called Tangy Tangerine that I had to buy from Amazon.com to see if that would help and wants to see me back in 6 weeks.  I'm not relieved to have fibromyalgia.  It sucks like an open chest wound.  Especially what happened next.  The very next day I was in so much pain from my left shoulder that I really wanted to die.  You would just not believe how many movements you make involve your shoulder!  That was on Sunday.  Aleve didn't touch the pain, 800 mg of Motrin didn't touch it and I was looking through my husband's mini pharmacy for some oxycodone but didn't find any.  By 5:30 am on Tuesday I had had enough.  Three days without sleep and I was in tears.  I begged him to take me to the ER.  Did I tell you that my husband doesn't believe in fibromyalgia?  He doesn't have a clue!  Luckily, at that time of the morning I was the only one in the waiting room so I was taken back and immediately given IV morphine.  I was in heaven!  After 5 hours there I was sent home with prescriptions for oxycodone, Motrin 600 mg, and I think doxepine for sleep (which I didn't need, thankfully).  I mostly slept for the next two days.  I finally felt more like myself on Friday and feel pretty great today.  I made an appointment to see my doctor again on Wednesday because I wanted him to know what happened.  He said that after 6 weeks on the supplements, if they didn't help he'd prescribe a pharmaceutical for treatment.  I think the options are something like Lyrica, Cymbalta, or Savella.  We shall see!  I also made sure that my husband's appointment coincides with mine so our doctor can tell him that yes, Virginia, there is such a thing as fibromyalgia!  Argh!

Saturday, June 22, 2013

Steep and Go Cold Brew Tea Infuser

I'm not sure what I was looking for when I happened upon the website for the Steep & Go but it was so compelling that I had to have one.  It is a way to cold brew loose leaf green & white teas and be able to take them on the go.  It's really simple.  You buy a bottle of water (they list brands it fits although it comes with an adapter so I assume it will fit those not listed), add your loose tea to the bottle, insert the Steep & Go, shake to mix leaves, & wait 10 minutes before drinking.  I like to add a squirt of agave, too! Surprisingly, I prefer the taste of 1 tsp of tea for a whole liter of water.  I tried it with 2 tsps at first but it tasted a bit bitter to me.  The filter keeps the tea from getting into your mouth while drinking (even the tiny ones).  I have infused the same leaves multiple times and am pleased with the way it works.  It is BPA free, dishwasher safe, and at $6.95 is very reasonable.


Before I got this, I used one of my son's sport water bottles with a wide mouth, dropped two green tea bags into it, a bit of agave, and filled with water.  I put it into the refrigerator for at least 10 minutes and it was ready to drink.  As I got close to empty, I just refilled with more water and set it back into the fridge.  I think I infused the same bags at least 3 times before I threw them away.

Cold brewing tea is a really great way to make delicate green and white teas.  When I first got into teas, I complained to my tea purveyor that I didn't like green teas because they tasted "fishy".  She couldn't tell me what I was doing wrong.  I figured out that I was trying to brew them at too high a temperature.  I was still convinced that they weren't my favorites until recently.  With all of the wonderful loose leaf teas that I have, I preferred the taste of Lipton Green Tea with Superfruit.  It is still my go-to green tea. 

Saturday, May 11, 2013

Happy Mother's Day!

Flowers from my youngest son.  Love both boys so much!


Tuesday, April 30, 2013

Bisquick 7 Up Biscuits

Oh my!  I am such a sucker for a good biscuit and have made a few that I thought were good but this one knocks them all down.  The ingredients are very surprising.  My friend, Steph, told me about these today.  A recipe she saw on Pinterest by plainchicken.com. 

Bisquick 7Up Biscuits

2 c. Bisquick
1/2 c. Sour cream
1/2 c. 7 Up
1/4 c. Butter, melted

Preheat oven to 450 degrees.  I also preheated my cast iron skillet but the recipe doesn't use one of these.  Stir sour cream into Bisquick then add 7 Up and stir until well mixed.  The batter will be very soft.  The recipe says to flour your board with more Bisquick and pat out the dough then cut out biscuits but I didn't do that either.  I took my hot skillet out of the oven and melted my butter in it.  Then I used a large ice cream scoop and dropped the dough onto the butter.  Bake for 12-15 minutes until golden brown.  This made 8 biscuits.


Monday, April 29, 2013

Pork roast made easy!

Pressure cooker pork roast

2 1/2 to 3 lb pork loin roast
1 pkt ranch dressing mix
1 pkt Italian dressing mix
1 pkt mushroom gravy mix

Pat pork roast dry & season w/salt & pepper, garlic & onion powder & brown in oil in your pressure cooker.  Mix dry mix packets with 1 1/2 cups water and our over pork loin.  Cover and cook at high pressure for 45 minutes or until internal temperature reaches 170 degrees.

Serve with garlic & parsley mashed potatoes & your favorite veggie!


Monday, April 15, 2013

Crocheted onion/potato keeper

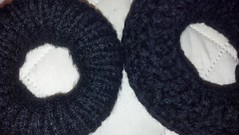
I love storing my onions in panty hose with a knot between each onion.  When I need one, I'd just snip off the bottom onion.  The panty hose allows air to circulate around the onions, which keeps them fresh longer.  What does one do when they have a few onions and no panty hose?  If you're me, you crochet a solution!  It works for potatoes as well.

Start with a circle of 12 dcs and increase 12 sts in each round of the next 3 rounds for 48 sts total.  To make the mesh portion start with a ch5 (counts as 1 dc + ch2), sk2 sts then dc in next st.  Continue to *ch2, sk 2, dc* around then join in the 3rd st of the ch5. Work to desired height.  I worked 25 rounds then worked sc all the way around the top, ch6, sk 2 mesh squares & join with sl st then turned and worked 10 sc to reinforce the loop.


Wednesday, April 10, 2013

Maple chocolate chip scones. Yum!

This morning, I was watching an episode of a Bobby Flay show in which he makes pumpkin/cranberry/candied ginger scones with maple butter.  It made me really want to eat a scone!  My son, Anthony, is home for spring break and his favorite scones are maple, so maple it is!

I adapted a biscuit recipe I found on the back of a Crisco can to make a great scone.  I have changed it up so many ways by substituting different extracts, adding fruit, nuts, chocolate chips, etc.  Whatever I add, I usually use about a 1/2 cup.  This recipe makes 8 or 9 scones.  Here it is:

 
Basic Crisco Scone Recipe

 
Preheat oven to 425 degrees
 

2 cups all purpose flour

3 Tbsp sugar
1/2 tsp salt
1 1/2 Tbsp baking powder
 
Combine dry ingredients then cut in with either fingers or pastry cutter until size of small peas:
 
1/2 cup Crisco
 
Add:
 
1/2 cup milk
1 egg, beaten
1 1/2 tsp maple extract  (vanilla extract in original recipe)
 
Finally incorporate 1/2 cup mini chocolate chips (optional)
 
Mix wet & dry ingredients until just combined.  If you overmix, your scones will be tough.  I don't roll out my dough and cut into shapes.  I use a large ice cream scoop then gently pat down the scone dough to flatten it a little.  Brush tops of scones with milk or cream.  Bake for 12-14 minutes until golden brown and skewer inserted in center comes out clean.
 
For maple icing:  I don't really measure anything for this.  I just put about a cup of powdered sugar in a quart sized freezer bag.  I add 1/2 tsp of maple extract and add milk one tablespoon at a time until it reaches a nice pourable consistency.  After scones have cooled, snip a small corner of the icing bag and drizzle icing over the tops.  Let set a few minutes before eating.


Friday, March 29, 2013

Aerolatte...frothed milk awesomeness!

I am absolutely obsessed with frothed milk.  I have a Breville espresso machine which makes great froth but since I've been using the Keurig more, I don't want to turn it on just to froth my milk.  I have been using an inexpensive hand held wand-type frother that I bought on eBay and it works well but when I saw how quick the Aerolatte froths (thanks YouTube) I had to have one.  I decided on the stainless steel version with stand from Amazon.com.   I am in love!  It makes easy work of my other new love, So Delicious Barista Style Coconut Milk Creamer.


Friday, March 15, 2013

Macarons!

Last week, my friend, Erika, and I went to a local farmer's market where I went especially to buy macarons from Sweets 507.  I had never had a macaron before but was so intrigued by them.  I wasn't disappointed at all.  These macarons were fantastic!  They were a box of 4 for $5 or two boxes for $9.  I bought a box of caramel filled and an assorted box containing one caramel, one raspberry, one pina colada, and one tropical hibiscus filled.  While the homemade caramel filling was delicious, the assorted box was exciting.  I polished both boxes off in two days and had dreams of macarons every night after that.  As usual, I checked YouTube for a tutorial and found many to chose from.  I chose this one but looked at a couple more as research.  I also have the current issue of Tea Time magazine which happens to have macarons on the cover and a recipe inside.  Most recipes I found have measurements in volume but the recipe I chose uses weight as the measurement. 

Macarons

3 egg whites, aged in fridge 3 days
180 g powdered sugar
100 g almond flour (Bob's Red Mill)

I filled with cream cheese frosting and jam or cream cheese frosting and Nutella.

Please follow the video for instructions.

I'm really excited because I was led to believe these cookies were hard to make.  They were not. 

Friday, March 01, 2013

Afternoon tea @ English's Quintessentially British

Today my friend, Stephanie, and I went to English's Quintessentially British Gastro Pub at Town Square here in Las Vegas.  I just recently found out that they serve an afternoon tea service and we wanted to try it.  We both decided on the cream tea for $20 pp.  It was a beautiful day so we decided to sit outside on the terrace.  She ordered a blackberry black tea and I ordered the tropical green tea.  Right away I spotted a problem.  The tea was served loose in the pot with strainers on the side.  It continued to steep and eventually both of us were left with bitter tea by our second cup.  Our favorite savory was the cheddar cheese with branston pickle.  Our least favorite was the egg sandwich.  The scones and strawberry jam were very good and the whipped cream was so delicious that we agreed we could have eaten it right out of the cup.  Unfortunately, after two pots of tea, extra sandwiches, and two scones, I didn't have room for the sweets.   We were the only ones at the pub having the tea.  All of the other patrons were having beer and the regular pub menu, which, judging from the scents wafting our way, must have been scrumptious!  I can't wait to share this with the other girls!
After tea, Steph and I hit the Teavana store.  I really wasn't expecting to buy anything but because it is my birthday month I treated myself to this Russian inspired infuser mug.  Years ago, I fell in love with the Cobalt Net pattern from the Lomonosov Porcelain Factory in St. Petersburg, Russia but it is out of my price range at $80 per cup and saucer set.  This infuser mug was only $21.95!  Of course, what good is a new tea cup without new tea?  A customer ahead of my bought some of this Cococaramel Sea Salt herbal tea and when the tin was opened, it smelled so good!  I usually don't like Rooibos but I am willing to try this one.  It has bits of chocolate, caramel, and sea salt.  How can that be bad?
Thanks for a great day, Steph!

Monday, January 07, 2013

Pork Paprikash with Nokedli

We just had a houseguest over the Christmas/New Year holidays from Budapest, Hungary.  She is such a sweet girl and I miss her.  I don't know why I didn't think of doing this while she was here, but tonight for dinner I am making a Hungarian inspired dish. 


Pork Paprikash

9 - thin sliced pork chops, cut into pieces
2 Tbsp vegetable oil
2 onions, sliced thin
2 tsp crushed garlic
1 diced tomato
salt
pepper
3 Tbsp Hungarian sweet paprika
1 1/2 cups water
1 Tbsp chicken bouillon
1 cup sour cream
1 Tbsp flour

Heat oil in large caldero or chicken fryer over medium to medium high heat.  Trim excess fat from pork chops and cut into 3" pieces.  Salt and pepper the pork.  Brown the pork in oil in batches and set aside.  When all of the pork is removed from the pan, add the onions and saute until translucent.  Add garlic and tomato and saute for a couple of minutes.  Add the pork back to the pan with the water and chicken bouillon.  Set the heat to low and simmer for 45 minutes.  Once pork is very tender and onions are nearly disintegrated, add flour to sour cream and add approximately one cup of sauce to sour cream/flour mixture to temper and pour over contents of the pan.  Mix thoroughly.  Serve over nokedli or spaetzle.  I'm sure rice or egg noodles would work too!


Nokedli/Spaetzle

2 cups flour
2 eggs
1 tsp salt
3/4 c milk or water

Mix all ingredients thoroughly.  Using a spaetzle maker, drop dough over boiling salted water.  Cook until the dough rises to the top.  Drain but don't rinse.  Serve with paprikash on top.  Yum!  I also like to make spaetzle and after it has drained, I will saute in some lightly browned butter and top with Parmesan cheese.  YouTube has many spaetzle/nokedli videos.  I bought my spaetzle maker from Amazon.